My 10 Favorite Drought Tolerant Plants

Plants For a Tight Water Budget

By Heather Stone

 Here in Colorado, our summers are often hot and dry and there’s often some sort of “watering restrictions” in place. Those two words can bring just about any gardener to their knees.  But, you can still have a garden filled with beautiful flowers even if you’re on a tight water budget.  In my Zone 5 garden, these plants perform well whether we have a temporary or longer-term drought situation.


Yarrow- Achillea

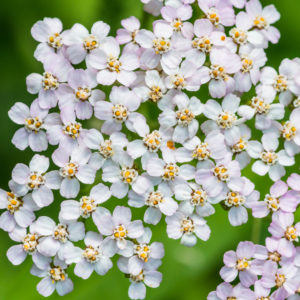
This long-blooming perennial comes in a rainbow of colors (pink, white, red, orange and yellow).  The colorful blossoms are attractive to butterflies and make a good cut flower. Yarrow is hardy in Zones 3-9 and is best planted in full sun.


Lavender- Lavandula

Purple Lavender blossoms.

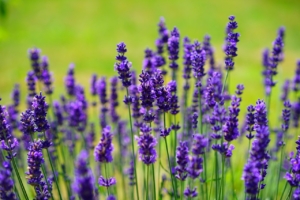
Photo courtesy of Hans / pixabay

This native Mediterranean plant is accustomed to dry, sunny conditions.  The beautiful purple flower spikes look great on their own or in the border.  Lavender is prized for its fragrance and medicinal properties and is attractive to many pollinators. Hardy in Zones 5-10.


Sedum –Sedum spp.

There are many varieties of sedum from upright to low growing groundcovers.  They are sure to fit in just about any garden design from the back of the border to the rock garden. These easy to grow plants need little care once established.  Hardy in Zones 3-9.

Coneflower –Echinacea spp.

These beautiful, long blooming perennials are not only drought tolerant but will thrive in almost any soil and often self-sow. The blossoms are attractive to both butterflies and birds. The goldfinches love to eat the seed. There are several species and many varieties of this rugged plant with flowers in many shapes, sizes and colors. Don’t leave this trusty plant out of the drought-tolerant garden.Purple Coneflower bloom with bumble bee.

Soapwort- Saponaria spp.

A profusion of pink blooms covers this low growing plant for weeks in the spring attracting many bees and butterflies. This hardy evergreen plant grows best in Zones 3-8.  Soapwort was used by the early settlers to make soap.

Mexican Hat- Ratibida columnifera

This sun-loving wildflower is both long-lived and long blooming and thrives in dry conditions.  The dark red blossoms look great planted in masses, attracting many bees and butterflies. Mexican hat is both a great cut and dried flower. Hardy in Zones 4-8.

Veronica spp.

Covered in blue, purple, white or pink flowers for weeks in spring or mid-summer this long blooming perennial comes in a variety of sizes. Clump forming varieties look great along the edge of the garden or the groundcovers really make a statement in the spring when covered in a mass of blue flowers. Plant in full sun. Hardy to Zones 3-9.

Beardtongues- Penstemon spp.

Native to most parts of North America Penstemons are a great choice for the dry garden. Their flowers are attractive to many pollinators and come in a variety of colors, sizes, shapes and bloom times. Some excellent choices for the dry garden include Penstemon Mexicali, P. pinifolius, P. eatonii,  P. strictus.

Catmint- Nepeta spp.

Catmint is a show stopper, blooming from early spring to early fall. The fragrant blue-purple flowers are attractive to many pollinators. This nearly indestructible plant is both deer and rabbit resistant and thrives in full sun in Zones 4-9.

How to Get Rid of Weeds

Tips for Weeding

by Sandy Swegel

That’s the question I hear most often in Spring.

The question comes most often from my friends who are very smart and successful in busy lives.  Their garden is one aspect of their beautiful complicated lives but it’s always a challenge because it’s not easy to make nature conform to what you want with one big weekend cleanup.

So there was an animated discussion about the best digging tools and homemade vinegar solutions. Everyone wants to protect the earth and the bees but frankly feel they have failed when the same weeds overwhelm their garden every season.  You know the weeds I mean, the ones that have grown very tall when you walk into your yard in late June and see that they just went to seed, making thousands of new baby weeds.

At some point, someone asks me what my tool is as a professional gardener.  My friends never find my answers very entertaining, so they usually return to a discussion of their latest internet surefire natural weed killer.  Nevertheless, here is my answer from years of experience of dealing with weeds.


The best tool is diligence.  Weeds have a strong will to live and procreate.  You have to be vigilant for them and keep after them.

After setting a firm determination about what weeds are permissible and which aren’t, then here are some techniques.

Get them when they are little.

Right now in your gardens, there are thousands of tiny weed seedlings you could control with one stroke of your hand hoe.  Off with their heads:  tiny seedlings don’t survive if they loose their leaves. Learn what young weeds look like.  Bindweed babies are cute little heart shapes.


Learn to love them. 

Dandelions are the best example of a “weed” you can learn to love.  In moderation of course.

They are very cute…children love them.  They are one of the first foods of hungry bees each Spring.  You will have more time and less frustration in your garden if you don’t have to eradicate all the dandelions.


If you do decide to get rid of perennial weeds…be smart and determined.  Don’t just hack it up in frustration every Spring and let it grow and strengthen the rest of the year.  You can’t get nasty perennials all at once….but you can wear it down and weaken it.  I have a sharp hori-hori knife and dig out at least four inches of root.  If the weed reappears, I recognize it and dig a little deeper the next time.  Soon it will exhaust itself and give up.


Finally, have a cup of tea.

Or at least get the electric kettle out.  Boiling water or hotter steam does an excellent job in rocks and walkways,  especially when weeds are young. And it is very satisfying.


Photocredits

https://weedecology.css.cornell.edu/weed/weed.php?id=6

http://www.blikk.hu/eletmod/tippek/elleptek-a-kertjet-a-gazok-igy-szabadulhat-meg-toluk/f38r539


YELLOWJACKET TRAPS, THEN PANSIES

Spring Solutions for Yellow Jackets

By: Sandy Swegel

Is Spring about to happen in your neighborhood? Before you start getting pansies or collecting daffodils, stop and put out your yellow jacket traps…if yellow jackets are a problem for you in the summer.

The yellow jacket life cycle is pretty simple. Almost all the yellow jackets die off in winter. Single queens that already “mated” go into winter hibernation…in the ground, or your shed, or woodpile. Once warm weather starts in the Spring the queen wakes up, builds a new nest and starts laying eggs for this year’s yellow jackets. One little queen easily lays 500 eggs. Conservatively, every queen you catch now means hundreds fewer yellow jackets gathering at your picnics in the yard this summer. It is so much easier to catch one queen now than to tackle nests full of angry yellow jackets under your picnic table in July.

A simple pheromone trap works great…it lures the queen to those yellow plastic hanging traps. This is no time for simple soapy water. You’ll be glad you spent the $5 for the pheromone lure refills. And the lure doesn’t affect honeybees.

Catching the queens isn’t always predictable. I put up more than one trap. Last year the trap by the BBQ grill caught ten queens. And a trap under a tree caught two. It seems to differ every year. But I will be grateful come summer.

It’s definitely the time in this warm March we’re having in Colorado. It was 80 degrees today…I got stung cleaning up debris in the perennial bed. The queen rolled over from her winter nap and sunk her stinger into me as revenge. Ouch. Yellow jackets hurt so much more than other wasps. If you don’t go outside in the summer, then let the yellow jackets live. But since they don’t play well with others, I believe in a strong birth prevention policy.

Photocredits:
www.rescue.com/bug/yellowjackets
greenbugpestandlawn.com/learning-center/flying-pest

The Windy Garden

Building a Wind Resistant Garden

By: Sandy Swegel

This could be a perfectly beautiful early Spring. We’ve had a week of warm sunny weather that is waking up the daffodils and tulips. Birds are flitting about and energetically singing out mating calls. It’s a joyful break from dark winter days. But then there’s the wind. Chinook winds. Or as they were called the year I lived in the Alps, “scheiss foen.” Everyone understood if the foen had arrived that you could be in a foul mood because of the irritability and headaches from the air pressure changes these mountain-made winds caused.

Wind can have devastating effects on a garden. Sure the strong winds can break stems and tree branches, but the greatest stressors comes from the drying effects of the winds. Plants close their stomata (leaf pores) to reduce water loss, but that slows the plants’ ability to grow. The winds desiccate the plant tissue and dry out the top inches of the soil meaning the plants need more water. Even plants under snow cover can get very drought stressed because the winds evaporate the snow before it can melt.

If it’s going to be a windy season, I make a few mental changes in my garden plans. Here’s things to consider if you have a windy garden:

Use more drought tolerant plants.
Increase your watering after the winds die down.
Grow shorter plants.
Grow plants like lavender with thinner leaves that won’t desiccate so easily.
Plant some tall ornamental grasses through the flower garden. They look beautiful in the wind and provide some wind break protection.
Plant evergreens as windbreaks.
Consider a garden wall.

And take an aspirin for your sinus headache.


Photocredits:

http://clarenbridgegardencentre.ie/
Top Tips for Windy Gardens
http://www.pc.gc.ca/pn-np/ab/waterton/ne/ne-galerie-gallery-2.aspx?a=1&photo=%7Bdfae32e8-4d1e-47e4-a909-08c9ea68dd13%7D

February Plant of the Month – Carrots

Plant of the Month

February 2017


Common Name:

Scarlet Nantes Carrot

Scientific Name:

Dacus carota var. sativus

Native Range:

Mediterranean Region

Hardiness Zone:

4 to 10

Days to Maturity:

65-75

General Description:

Scarlet Nantes Carrot is a standard market carrot that has a long, cylindrical shape and a rich reddish-orange color. The flavor is sweet and delicious. Roots are fine-grained, containing almost no core. High moisture content makes this variety perfect for juicing. Carrots can reach up to 7 inches long. To prevent diseases, rotate planting location every season.

Site Requirements:

  • Light: Full sun. Will tolerate very light shade.
  • Water: Moderate moisture. Crusted soil can suppress germinated sprouts.
  • Soil: Well-drained soil with organic matter. The area needs to be free of stones.

Seeding:

This cool-weather crop is easily over-planted due to its fine seeds. Sow seeds directly into loose soil in early spring 2-3 weeks before last frost date. Carrots are slow to germinate, emerging in 2-4 weeks. Cover seeds with a ¼ inch of soil—no more than ½ an inch. Lightly water seeds every day for best germination. Once sprouts emerge thinning is critical to reducing competition. Thin seedlings to 1/2 – 1-inch spacing. Best time for thinning is when soil is damp. Plant seeds every 2-3 weeks throughout midsummer for continuous harvest.

Harvest Time:

Start harvesting as soon as carrots have reached the desired size (up to 7 inches). Try pulling up one at a time to check the size. Watering the area before harvest can make pulling by hand easier. Harvest by mid-September to avoid pest damage.

Fun Facts:

  • Carrots are a great source of fiber, potassium and vitamin A.
  • Carrot greens can be used in soup stock, pesto, curries or tea.
  • Common pest: carrot rust fly
  • British gardeners plant sage around the area to repel the carrot fly

February Plant of the Month – Beets

Plant of the Month

February 2017

Common Name:

Detroit Dark Red Beet

Scientific Name:

Beta vulgaris var. crassa

Native Range:

Europe & Asia

Hardiness Zone:

2-7. For zones 8-11 grow as a fall crop

Days to Maturity:

55-65

General Description:

The Detroit Dark Red Beet is the most popular all-purpose red beet. It is globe-shaped, tender with blood-red flesh that is sweet and delicious. Beets are easy to grow and tolerate a wide range of climates. Beets prefer cool weather; in zones 8-11 where summers can be hot, grow them as a fall, winter or early spring crop.

Site Requirements:

  • Light: Full sun to part shade
  • Water: Consistent moisture
  • Soil: Well-drained, sandy loam soil high in organic matter. Avoid acidic soil areas.

Seeding:

Sow seeds directly into soil in early spring as soon as soil can be worked. Beets tend to have spotty germination. Presoaking seeds for 1-2 hours will soften seed coat and speed germination. Plant seeds ½ inch deep and 1 inch apart. Seeds need close contact with the soil; it is best practice to press down on soil after planting. Sprouts will emerge in 10-20 days. Thin seedlings when they reach 4-5 inch to 3 inches apart.

Harvest Time:

Pull up plants when exposed root tops are 2 inches across.

Fun Facts:

  • Reddish green leaves make a great addition to summer salads
  • Planting garlic and mint with your beets will improve the growth and flavor
  • Beets are very sensitive to toxic substances in the soil and may not germinate if planted near walnut trees or soils containing herbicides

Garlic Chives – A Rugged Plant with Pretty Flowers

Cover Crop Seeds

by Sandy Swegel


It’s that time of year when I nominate plants for this year’s Garden Awards. All Fall I’ve been admiring one plant that is a “crossover” plant able to be a contender in both the “Tough and able to handle the absolute worst soil and little water” category AND a nominee in the “Aren’t You Pretty” category. That stellar plant this year is Garlic Chives (Allium tuberosum). It gets extra kudos for being a late-season nectar and pollen source for bees and butterflies too.

The flowers are beautiful little white stars. Even as they turn to green seeds pods, they are still attractive enough to put in a vase. I’ve never seen any bugs or pests or disease on the chives…probably because they do smell like garlic.


Pungent aroma is one reason they aren’t a perfect garden flower. The greens are edible just like garden chives (and known in Asian cooking as Chinese chives). The flavor is more garlicky than oniony. They are lovely thrown in a stir fry or sauteed and served in egg or tofu dishes.

Now full disclosure requires I tell the other downside of garlic chives: they make a lot of seeds. And they love to reseed in rocks and crevices of garden walls. I deal with this by dead-heading the seed heads in about October before the black seeds drop. While this can be a bother in an irrigated flower garden, it’s not a problem at all in a tough xeric area where there’s not much water anyway.


You can direct seed the chives or start them and transplant. The only extra requirement they have is that they need dark to germinate well….so sprinkle some soil over the seeds. Most of the time the chives overwinter or reseed. They grow in clumps about a foot tall and the flowers are one-two inches wide…depending on your water and soil fertility. If you have sun and moist soil they grow big and spread quickly. But part shade is fine. So is very dry or heavy clay soil. The plants will be smaller, but still impressive.

Yes, that’s what the garlic chives were this year: impressive. Tough plants and pretty.

Photo Credits
http://www.missouribotanicalgarden.org/PlantFinder/FullImageDisplay.aspx?documentid=10864
https://www.mountainvalleygrowers.com/alltuberosum.htm
http://statebystategardening.com/images/uploads/article_uploads/11June_mwnews_5-B2.jpg

Stop the Powdery Mildew Cycle this Fall

Gardening Tips

by Sandy Swegel

Powdery mildew had a grand time in my garden this year. I often have a nonchalant attitude to it growing on a few leaves and don’t mind a little bit. But it started early this year on roses, then showed up on the bee balms and finished out the season inundating the sweet peas and squashes. By the time I paid attention, it was out of control.

But now it’s Fall and my inner lazy gardener says…ah well this season is over. Next year it will be different. But if we want to make progress against disease in our gardens, now is the time to act.


Do you Want Less Disease in your garden next year? Then take these steps now:

In the Vegetable Garden
As your squash and cucumbers and pea plants are dying back, remove those leaves and put them in the trash. Not in the compost pile. Don’t let them overwinter and deal with it in the Spring. Fungus and disease spores are sitting passively on the backs of those leaves, just waiting for rebirth next Spring. They do not reliably die in home compost piles. Powdery mildew will survive the winter by forming minute fruiting bodies called cleistothecia And tomatoes? I put the whole plants in the trash after frost. There are just too many diseases on them to risk.

In the perennial beds, leaves infected with powdery mildew like rose or phlox or bee balm often drop before Fall. Before the big tree leaf fall, I use the blower to blow the diseased leaves out of the bed and PUT THEM IN THE TRASH.

This vigorous sanitation is a good idea for all pests too. If you had bean beetles…get rid of those leaves that might have next year’s eggs.

But don’t be too clean.
That’s the important lesson here. In the non-diseased parts of the garden, ladybugs and lacewings and lots of beneficial insects are going to lay eggs and overwinter. We want them. I learned last year especially to let willow leaves be…there were dozens of beneficial babies at the base of willow plants last spring.


And next year…be attentive to the powdery mildew. I now promise to treat early and often with something gentle but effective such as horticultural oil or a baking soda. I lost a lot of production in my vegetables this year because I let the powdery mildew have its way. And the roses and phlox really took a hit. I’ll do better next year. I promise.

Photos:
ipm.ucanr.edu/PMG/PESTNOTES/pn7406.html
startorganic.org/tips-for-treating-powdery-mildew/

How to Have Fewer Green Tomatoes

Gardening Tips

by Sandy Swegel

First Frost is fast approaching and we’ll be reaching for our green tomatoes recipes when all those green tomatoes are hogging our countertops. No matter how clever, green tomatoes aren’t as wonderful as red tomatoes. So act now to get those green tomatoes to turn red on the vine.

Now is the time to prune off the tops of your tomatoes plants in order to get them to focus on ripening the tomatoes they already have. After the blistering heat of August that brought pollination to a stop, cooler temperature plants confuse tomatoes into growing new leaves and flowers. Tomatoes are multi-tasking to an extreme now, ripening old fruit, setting blooms, pollinating, etc. Any new blooms won’t have time to even become edible green tomatoes.

So be brave and CUT OFF the top foliage especially stems with new flowers.

CUT BACK excess foliage throughout the plant to expose the current bigger tomatoes to more light.

Keep your tomato comfortable in its dotage:

*Keep the soil evenly watered.
*Wash off aphids if they start up again.
*Lightly fertilize with a liquid fertilizer a few weeks before frost.
*Have frost cloth or old bed sheets ready to throw on overnight. Sometimes if you can protect from one or two nights frost, you’ll have a couple more weeks of warm weather.


You want your tomato to focus on one thing only: ripen the remaining tomatoes while they are growing on the vine. That’s how they taste the best!!!


Photos:

http://www.rodalesorganiclife.com/wellbeing/summer-vertical-gardening

Bunnies in the Garden…What Works, What Doesn’t

Gardening Tips

by Sandy Swegel

We’ve had a bunny explosion the last few years. Population growth has been so pronounced that just walking around the neighborhood in the morning I see at least two bunnies per front yard. The problem with bunnies is that they make babies like crazy and each bunny eats a lot of plants. They particularly like young tender plants and flowers which is devastating for the garden.

If you are serious about protecting your garden from rabbits, you must be vigilant.

Strategies that Work

GET the rabbits out of your garden.

KEEP the rabbits out of your garden.


This is the only strategy that really works. And it takes a lot of vigilance to build an effective barrier and perseverance to get every bunny that comes into the yard out of there.

First, you have to have a really good fence that goes all the way into the ground. Wood is just another food for bunnies so you’re going to need supplemental chicken wire or a stone barrier at the base. Every time there is another rabbit in your garden you have to figure out how it got in and close that opening. And you have to remember to always keep the gate closed. I can remember the sneaky bunny that waited while I rolled the garbage can out to sneak in the yard.

Second, for the rabbits already in your garden, you have to trap them or dispatch them or even get the dog to chase them out an open gate which you quickly shut behind them.

I know people who live-trap the rabbits and bring them to rescue places, and I know people who sit in their gazebo in the evening with a beer and a shotgun. You have to determine your level of lethality. But you have to get rid of the bunnies.

Strategies that sorta work but don’t solve the problem

Repellents
An otherwise intelligent friend has strung soap across her yard because she read on the internet that Irish Spring works. It doesn’t. Bunnies are darn smart and aren’t kept from a succulent meal because something smells funny. They also don’t fall for the fox urine scent thing…They look around. They can see there is no fox. Repellents can work for the plant you spray them on….if you keep respraying. But you’ll go broke buying repellant for every plant in your yard.

Dogs
Dogs do keep down the number of rabbits, but dogs on the hunt for rabbits can dig holes and tear up your garden better than any rabbit can.

Trap crops
Some people try growing plants like clover the bunnies love to keep them off the good plants. This is marginally successful in the short term, but ultimately, you’re feeding the bunnies.

What bunnies have going for them is that they are incredibly cute and fertile. They also have the support of your neighbors who feed them. A neighborhood-wide eradication program might work, otherwise, you just have to build your fortress and keep it defended. If you’re lucky like a friend of mine is, a great horned owl will move into one of your trees and take care of the would-be intruders.

Photos:

https://en.wikipedia.org/wiki/Great_horned_owl
http://forums2.gardenweb.com/discussions/1386301/how-to-rabbit-proof-raised-beds
http://pestkill.org/other/rabbits/how-to-keep-out-of-garden/