Get A Head Start on Leeks

Get a head start on leeks

Heirloom Vegetable Seeds

by Sandy SwegelAmerican Flag Leek

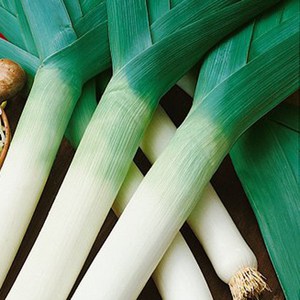
Organic leeks were $3.99 a pound in my grocery store this week. I love leeks because they add a more rich and complex flavor to soups and sauces than onions do. They are more expensive than onions but just as easy to grow. The only challenge for gardeners in areas with winter is that leeks have a long growing season and it’s not as easy to find leek seedlings for sale come planting time. In January, you can get a head start on leeks as this is an ideal time to start some seedlings to transplant this spring.


The ideal germination conditions for leek seeds are about 70 degrees in moist soil. They will germinate in cooler temperatures but may take a few more weeks to emerge.

Even though the seeds are small, germinate them in containers at least four inches deep rather than in a very shallow tray. We gently push the seeds about half an inch deep into the light potting mix. The seedlings don’t need individual cells so you can grow them in one big container. Their roots will intertwine but easily tease apart without breaking come planting time.


Once the leeks are growing they will continue to need light but easily handle cooler conditions if you need your indoor lights for something else. An unheated cold frame or a makeshift hoop house works great.

Come planting time, we plant the baby seedlings into six inch deep trenches (we want lots of long white stems). For now, just get those seeds started. The only thing to remember is not to let the soil dry out.

I always grow more leeks than I’m going to eat and leave them in the garden to flower. The leek flowers are beautiful and attract butterflies and bees!

Garlic: Last crop of the season.

Cover Crop Seeds

by Sandy Swegel

It’s still unseasonably warm in many parts of the country. Most but not all leaves have fallen. Tomatoes are miraculously still ripening…there won’t be many green tomatoes this year. But the easiest crop of all can be planted very quickly if you haven’t gotten it in the ground yet.

Garlic gets planted in the fall because it does best with a cooling period before growth. Garlic grows very easily and will grow even in poorer soil. But give it good garden soil and good moisture (winter rains and snow usually take care of the moisture) and you’ll have fabulous tasting fresh garlic all year…scapes in Spring and cloves in summer. It really does taste better than the traditional store-bought.

If your soil is fairly soft and porous, you can just poke your gloved finger down into the soil and drop a single clove in…pointy side up. My soil is tough so I carve a hole with my hori hori knife. You can leave the paper on the clove. Space the garlic about six inches apart. You can do rows or a grid. Press the dirt back on the hole. Mulch if you have some leaves or compost. Water if your soil is dry.


Truthfully, planting garlic takes less time than chopping up garlic for dinner. The traditional time for planting garlic is October-November. Our local garlic market farmer says she’s been known to be in the fields Thanksgiving morning brushing away snow and pressing the cloves in. Just get it done. If you don’t have fancy planting cloves, just use some organic garlic from the grocery store this year.


You can get fancier and fussier about planting garlic and amend the soil or pre-soak cloves or dig perfectly measured trenches. But I’m outta time and interest this year….thinking about Thanksgiving already. So I’m going for “good enough” because I’m just so busy this year and garlic is very forgiving.

The garlic will be finished maybe late June so choose a part of the garden you won’t need until them. Someplace the squash will eventually grow over is a good spot.

Photo:
http://www.rodalesorganiclife.com/garden/trick-planting-healthy-garlic

Garlic Chives – A Rugged Plant with Pretty Flowers

Cover Crop Seeds

by Sandy Swegel


It’s that time of year when I nominate plants for this year’s Garden Awards. All Fall I’ve been admiring one plant that is a “crossover” plant able to be a contender in both the “Tough and able to handle the absolute worst soil and little water” category AND a nominee in the “Aren’t You Pretty” category. That stellar plant this year is Garlic Chives (Allium tuberosum). It gets extra kudos for being a late-season nectar and pollen source for bees and butterflies too.

The flowers are beautiful little white stars. Even as they turn to green seeds pods, they are still attractive enough to put in a vase. I’ve never seen any bugs or pests or disease on the chives…probably because they do smell like garlic.


Pungent aroma is one reason they aren’t a perfect garden flower. The greens are edible just like garden chives (and known in Asian cooking as Chinese chives). The flavor is more garlicky than oniony. They are lovely thrown in a stir fry or sauteed and served in egg or tofu dishes.

Now full disclosure requires I tell the other downside of garlic chives: they make a lot of seeds. And they love to reseed in rocks and crevices of garden walls. I deal with this by dead-heading the seed heads in about October before the black seeds drop. While this can be a bother in an irrigated flower garden, it’s not a problem at all in a tough xeric area where there’s not much water anyway.


You can direct seed the chives or start them and transplant. The only extra requirement they have is that they need dark to germinate well….so sprinkle some soil over the seeds. Most of the time the chives overwinter or reseed. They grow in clumps about a foot tall and the flowers are one-two inches wide…depending on your water and soil fertility. If you have sun and moist soil they grow big and spread quickly. But part shade is fine. So is very dry or heavy clay soil. The plants will be smaller, but still impressive.

Yes, that’s what the garlic chives were this year: impressive. Tough plants and pretty.

Photo Credits
http://www.missouribotanicalgarden.org/PlantFinder/FullImageDisplay.aspx?documentid=10864
https://www.mountainvalleygrowers.com/alltuberosum.htm
http://statebystategardening.com/images/uploads/article_uploads/11June_mwnews_5-B2.jpg

How to Have Fewer Green Tomatoes

Gardening Tips

by Sandy Swegel

First Frost is fast approaching and we’ll be reaching for our green tomatoes recipes when all those green tomatoes are hogging our countertops. No matter how clever, green tomatoes aren’t as wonderful as red tomatoes. So act now to get those green tomatoes to turn red on the vine.

Now is the time to prune off the tops of your tomatoes plants in order to get them to focus on ripening the tomatoes they already have. After the blistering heat of August that brought pollination to a stop, cooler temperature plants confuse tomatoes into growing new leaves and flowers. Tomatoes are multi-tasking to an extreme now, ripening old fruit, setting blooms, pollinating, etc. Any new blooms won’t have time to even become edible green tomatoes.

So be brave and CUT OFF the top foliage especially stems with new flowers.

CUT BACK excess foliage throughout the plant to expose the current bigger tomatoes to more light.

Keep your tomato comfortable in its dotage:

*Keep the soil evenly watered.
*Wash off aphids if they start up again.
*Lightly fertilize with a liquid fertilizer a few weeks before frost.
*Have frost cloth or old bed sheets ready to throw on overnight. Sometimes if you can protect from one or two nights frost, you’ll have a couple more weeks of warm weather.


You want your tomato to focus on one thing only: ripen the remaining tomatoes while they are growing on the vine. That’s how they taste the best!!!


Photos:

http://www.rodalesorganiclife.com/wellbeing/summer-vertical-gardening

Squash Bee

Peponapis: A Squash Lovin’ BeeSquash Bee

Jul 19, 2016 04:54 pm | thebeeswaggle

by Jessica Goldstrohm

Did you know some bees are very dependent on particular species of flowers?

This lovely bee is the squash bee, and I was fortunate enough to discover her, along with may others nestled inside squash flowers of a good friend’s garden! This was a very healthy and thriving collection of squash bees, and they are very specific to squash plant reproduction.

Squash bees are quite predictable in the flower preference they have; squash flowers, any type of squash flower, but it must be a squash flower.  They fly very early in the morning, sometimes before dawn seeking the opening squash flowers.  The females will spend much of the morning nestled inside squash flowers, circling the stamen of the flower, collecting nectar and pollen for their nests.  In fact, you will often find groups of squash bees within each squash bloom, absent of any conflict among them.

07.29.16 SquashBee2

Squash Bee

My photos too!

Squash bees are solitary nesters, meaning they work independently to build her nest, lay eggs, and collect all resources for the eggs they lay.  However, they may nest in aggregations of hundreds, kind of like apartment buildings are to humans. We live next to each other, but we all lead separate lives.

Squash bees prefer to nest VERY close to their favorite flowering plants, so you will most often find their nesting holes in the ground under squash plants.  Females will retreat to he nest come rundown, while males find a nice squash flower to sleep in until morning.

This activity continues throughout the summer, and partway into fall, then all the existing bees die, leaving behind the next season’s generation nestled all in a row of egg cells containing adult bees.  This new generation of bees will hibernate until the following spring or early summer when the squash plants are flowering.  Squash bees are so particular about the flowers they feed on, that their lifecycle revolves around squash plants!

I’m sure you may have already arrived at the question of what does that mean for them when we go to clear the dead squash plants at the end of the season?  Well, too much deep tilling can lead to complete destruction of a mother bee’s hard work.  Squash bees nest approximately 1.5 feet straight down into the ground, so only rigorous tilling harms nests. Leaving some of the plant behind can serve as insulation to the hibernating bees through the winter.

Next time you see a squash plant, take a peek inside to see a group of squash bees, and look under the squash plant for any holes in the ground that might be a squash bee’s nest.

There you have it! Another native bee we depend on to get resources we all enjoy in the fall!  I can’t wait to have some zucchini from my plants, and pumpkin too!  So many things occurring right beneath our noses, and we miss them when we don’t stop and observe.

Cheers to joining the movement to save our bees!

Time to Reboot the Veggie Garden

Gardening Tips

by Sandy Swegel

We ate the last of the Spring Peas this week. They were gnarly and kinda tough, but I savored the sweet Spring memories. Even though the peas were planted in a little shade and watered regularly, a pea plant can only take so many blistering hot days. Pooped-out peas are a sure sign that it’s time to start thinking about the Fall Garden. It seems slightly absurd since we still don’t have a single red tomato here in zone 5, but if I want a lush fall and winter garden, the time to reboot the spent Spring garden is now.

But it is July and it’s hot, so let’s start the fall garden in nice easy baby steps. These week’s plan is simple:

1. Pull out the finished pea plants. Pull out the weeds. Scratch in some fresh compost and keep the area watered for a few days as the soil settles down.
2. Plant some seeds. Keep the patch well moistened (or throw some row cover over to keep the water from evaporating so fast.
3. Have something cold to drink and flip through your seed cache or favorite seed website to plan something new and different the next time a little patch of soil is ready for replanting.

Some excellent July planting choices:

Leafy greens: arugula, Asian greens, collards, more kale or chard
Cool-season herbs like cilantro and dill
Root crops you want to enjoy after frosts like carrots and beets
Rapini (Broccoli raab)

Don’t stress yourself in the heat….just plant that one little patch that’s just growing weeds now and reap the rewards in September.

Photos:
http://www.popsugar.com/fitness/Healthy-Recipes-Winter-Vegetables-Fruits-21357784#photo-21357809

Keep Your Lettuce Sweet

Heirloom Vegetable Seeds

by Sandy SwegelRows of Lettuce

It’s only the beginning of June, but hot days can already cause your lettuce to begin to turn bitter or bolt. But an attentive gardener can keep her lettuce sweet and tasty with a few easy tricks.

Lettuce generally turns bitter when it begins to mature or bolt. The most obvious environmental factors that cause bitterness are high heat and water stress. There are some studies that suggest long day length also speeds bolting. It’s a bit too much trouble to test this and create darkness for your lettuce but there’s a lot you can do to sweeten your lettuce.

Keep it cool.

Light row cover over the lettuce in the easiest way to cool it down. Just keep the sun from baking it. Alternatively next year you can plant the lettuce somewhere it gets shade in the hottest parts of the day.

Keep it well watered.

Sometimes we don’t notice how hot it is becoming and we don’t increase our watering to compensate. Make sure your lettuce is consistently well watered and doesn’t go through stressful too wet/too dry cycles.

Thin your lettuce.

Loose leaf lettuce can get bitter from being planted too densely and not thinned. This is probably just water and nutrient stress from overcrowding, but give those plants a little more room. By thinning as lettuce grows.

Pick it in the morning.

A cool night is often enough to sweeten lettuce so pick the lettuce in the cool of morning, not just before dinner. Bring a bucket of water with you to harvest and put the lettuce directly into the water after picking.


And if your lettuce is already bitter?

No need to eat it bitter or toss it into the compost pile. Wash and dry the lettuce and put it in a crisper in the refrigerator for at least a few hours and up to a couple of days. Lettuce is one of those plants that keeps growing even after it is cut so it will often respond to its new cool humid environment by “sweetening up.”

If your lettuce is still bitter? Send it to compost or toss it in with other vegetables when juicing. You’ll get the vitamins but not notice the bitterness amid the other strong vegetable tastes.

Photo credit:
http://phys.org/news/2015-11-lettuce-quality-conditions.html

Weeds Are Our Friends

Tips for Weeds

by Sandy Swegel 

Say what? Well, Spring weeds ARE my friends. August weeds not so much. But Spring is finally overcoming winter and the big leafy weeds are the proof.

So what’s to love about Spring Weeds? The most important thing is they are an abundant source of food for pollinators. They are also delightfully pretty if you don’t think of them as weeds. I especially love the wild mustards. Invasive in lawns and on bare garden soils, blue mustards’ very tiny blue flowers are everywhere and are an excellent food source for awakening bees. Bees can’t live on dandelions alone you know.

To a gardener, the best part about spring weeds is WEED TEA and COMPOST.

Weeds, especially the perennial ones like dock and thistle, are an excellent source of nutrients because of their deep tap roots. To capture these nutrients in a usable form, you have to break down the plant tissue. The easiest thing to do is just keep throwing the leaves on the compost pile. This time of year your compost bin has too many “browns” anyway with all the dead winter material. The “greens” of spring coupled with warm weather jump-starts your pile.

But if you want to really get all those nutrients available to your plants and soil, you’ll want to make some Weed Tea.

Weed Tea Recipe

Get a big container.  A Rubbermaid garbage can will work, or make a small batch in a 5-gallon bucket. Put in all the weeds you can gather. I throw in cut leaves and whole plants. Put this container someway far away from your back door where you can’t smell it!

Here’s what’s going in my bucket:
Yellow dock leaves…these are everywhere.
Pulled or dug thistles.
Comfrey if you have it….these are especially full of nitrogen, phosphorus and potassium.
Nettles. Wear gloves.
Crabgrass with clumps of dirt still attached.
Dandelions, salsify, prickly lettuce, even bindweed if it’s up already. Nothing’s going to survive this stew.
Pond scum.


Now fill your container with water at least 12 inches over the plant material. And let stand until it is a disgusting gooey stew of fermented and stinking rotted material. Stir weekly. That smell is anaerobic decomposition. If the weather is warm, this takes maybe 10 days or as long as 4 weeks if it’s cooler. That’s it. You’ve made the best fertilizer you will ever use. Capture the liquid to use to pour directly (I dilute about 1 part weed tea to 4 parts water) on your garden beds. Strain some and put it in a sprayer for foliar feeding. Hold your breath and throw the stinking mess of weed material on your compost pile.

My favorite use of weed tea is to use it as a foliar feed and watch the treated plants green up overnight. This is especially good on tomatoes.  Spring Weeds really are a gardener’s friend!

Photo credits

http://wildfoodgirl.com/2013/denver-mustard-mania/

http://permaculturenews.org/2013/12/06/simple-recipe-fertilizer-tea/


Two Ways to Guarantee Your Outdoor Seeds Grow

Seed Starting

by Sandy SwegelPre-sprouting seeds

The next few weeks are crucial for new gardeners. Every year in Spring, first-time gardeners buy some seeds and dig up a garden on the first really warm weekend and sprinkle the seeds out. Then they wait. For some, within the month, weather conditions will be good and they’ll have their first garden seedlings and they will be totally hooked on the magic of gardening.

For others, something bad happens that the newbies don’t know about. They don’t realize they have to water. Or a couple of hot days come and burn the new seedlings to a crisp. Maybe the neighborhood crows watch you plant and come to eat every last pea. Sometimes the soil is cold and it’s just too early to germinate seeds. These newbie gardeners lose hope and say they just have a black thumb and give up gardening.

If you’ve had failures but are still willing to give a garden from seed a try, I have two techniques that virtually guarantee your seeds will germinate outdoors. These are especially good ideas if you’ve given up trying to grow some things because they never work for you. For years I just thought I was broccoli-impaired until I tried these hints.

First of course, you have to start your garden bed.

HOW TO START A GARDEN BED.

You can till and/or turn the soil by hand but you don’t have too if the soil is not solid concrete.
Dig out the weeds. Get the roots if you can.
Take a rake and make the soil level and a bit smoothed out.
Water soil with a soft sprayer if the soil is dry.
Sprinkle seed over the soil. How much seed and how far apart is written in the little print on the packet.
Pat the seed lightly with your hands so there is contact between the seed and the soil. Bury the seed slightly if the packet says so.

If you live in someplace humid and warm, that’s enough. Your seeds should come up.

If you live someplace dry or with fluctuating temperature or you’ve had failures in the past, try these two success techniques:

Sprouts

#1 ROW COVER

Lay a sheet of row cover loosely over the seeded bed. You want it nice and loose so the plants can grow and the row cover lifts with them. I use some heavy rocks to hold down the row cover so it doesn’t blow away. The row cover helps the seeds stay moist enough to germinate and raises the soil temperature a few degrees so the seeds germinate faster.

Water with the soft sprayer. Note….I water right on top of the row cover. You don’t have to lift it to water underneath often causing the seeds to float away. It’s permeable so the water makes its way through.

#2 PRE-SOAK AND PRE-GERMINATE the difficult seeds.

Pea sproutsSeeds like peas or carrots respond well if soak them in warm water in a bowl overnight, drain them, then plant. The soaking activates the enzymes that break the seed coat and speeds up germination. If it’s a seed you really have trouble with, you can put the seeds on a wet paper towel in a baggie and wait a few days until you see the sprouts.

These two shortcuts…pre-germination and row cover…work for me all the time. And I get better germination which means I get more plants per packet of seeds and save even more money.

Now go out and grow some food and flowers!


Photo credits:
http://daphnesdandelions.blogspot.com/2010_09_01_archive.html
http://learningandyearning.com/tag/pre-sprouting/

Tomato Lovers: It’s Time! Make Your Decisions!

Heirloom Vegetable Seeds

by Sandy Swegel

If you don’t already have your tomatoes growing….this is The Day. April 1st is my official day to start my tomatoes indoors. I’m in Zone 5 and last frost is six weeks away. You may start yours earlier if you live in a warmer place or have walls of water or other season extenders. No matter where you are, if you want tomatoes and haven’t seeded them yet…Do It Now. Or start a new variety or two because come late summer, we can’t possibly have too many tomatoes.

How to Decide What Tomato to grow.

Gardeners used to have only about five different varieties of tomatoes available to them. Now there are literally hundreds. Here are the tomato seeds we carry and the reason why you might grow each of them:

Beefsteak

Everybody knows this tomato. It’s the perfect big slice for hamburgers on the grill. It’s a manly tomato….a big sturdy tomato that holds up on the grill and on sandwiches.

Black Krim

This is my favorite tomato. It has a rich heirloom taste like many of the black tomatoes and it pumps out lots of medium-sized tomatoes. This makes it perfect for eating right off of the plant on a hot summer day. Earlier than some heirlooms.

Cherokee Purple

Cherokee isn’t just a marketing name. This is an heirloom tomato saved by the Cherokee people pre-1890s. Another black tomato with great taste. Gnarly looking tomatoes, too, which makes it even more interesting.

Amish Paste, Organic

This is a “paste” tomato. It’s very meaty and not too watery. It’s ideal for making sauces. Because it is so meaty, it’s also excellent for sun-drying. It is determinate, so most of the fruit ripens at the same time which is perfect for canning.

Aunt Ruby’s German Green

Remember to label this one in your garden. I spent one year waiting for them to turn red. Why grow green tomatoes? Because they have a unique flavor that is fresh and sweet. The flavor is lighter than the dark tomatoes. Aunt Ruby’s German Green is often a winner is our back yard taste tests.

Pink Brandywine

Brandywine is well known as an heirloom that defines what tomatoes “used to taste like.” These are big delicious fruit. Their growing season is a little longer so you have to be patient….but then they produce lots of tomatoes. And give this plant more space. It’s a giant.

Red Pear

Red pears are smaller pear-shaped tomatoes and are an heirloom dating back to colonial times. Pear tomatoes taste like regular tomatoes but are really prolific. In the olden days, people preserved them as “tomato figs.”