The ways in which to support tomatoes are as varied as the gardeners who grow them. Staking your tomatoes is important for many reasons. Keeping your plants upright and off the ground helps keep not only insects and critters at bay but can prevent many tomato diseases as well. Click here to check out our comprehensive guide to tomato diseases. Staking maximizes growing space, makes harvesting easier and keeps the garden looking tidy. Here is a little information about three different methods you can use to successfully stake your tomatoes.
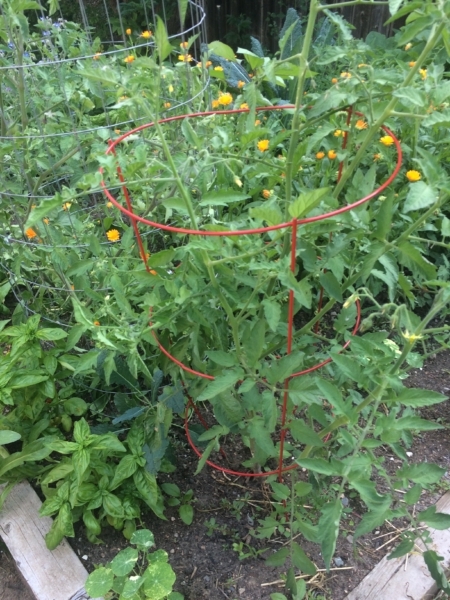
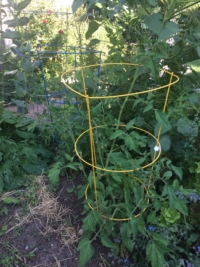
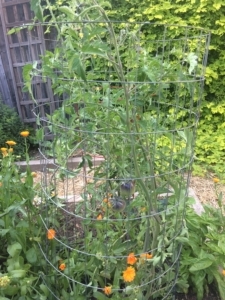
Cages
Caging tomatoes is an easy and efficient way for the home gardener to support tomatoes. Store bought cages come in a wide variety of sizes and colors. The smaller cages are more appropriate for determinate tomato varieties which are more compact in size averaging around 3-4’ tall. The larger cages will best suit the large, sprawling indeterminate varieties which can range in height from 6-12’.
You can make your own tomato cages too. Hardware stores sell rolls of wire fencing or mesh that when cut in 5’x5’sections can be rolled into a circular cage and placed over the plant. This is best done while the plants are still small. Pin the ends together with wire or zip ties and anchor the cage into the ground with stakes. Make sure your grid openings are at least four inches in diameter. This will make pruning and harvesting a breeze. These cages are sturdy and will last for years.
Stakes
Staking tomatoes is also an effective way to support your tomatoes. This method simply requires driving a stake into the ground near the plant and tying the plant up the stake as it continues to grow. To avoid any root damage, place stakes in the ground before planting or when plants are still young.
For indeterminate tomato varieties, stakes should be at least 7 feet tall and driven a good foot into the ground. This will keep the stake from tumbling over with the weight of the plant. Stakes can be wood, plastic, metal or made from salvaged materials. When tying up your tomatoes, it is best done loosely and with a soft material. I like to use old t-shirts cut into strips.
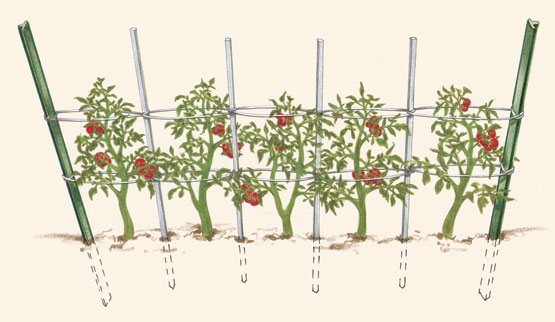
In the Florida or basket weave technique you are essentially sandwiching your tomato plants between two walls of twine. This technique works best when you are planting in rows. Begin by placing one stake at the end of each row, or space stakes every 3- 4’ apart for longer rows. Drive stakes into the ground at least one foot deep. Next, tie your twine to your end stake about 8-10” from the ground. Pull the twine past one side of your tomatoes to the front of the next stake. Loop the twine around the back of the stake and pull tight. Keeping the string taught continue down the row until you reach your last stake. Tie off at the last stake. Now, loop back the other direction until you are back where you started. Tie the twine to the first stake. As your tomatoes grow you will need to add another layer of twine about every 6-8” to keep the plants upright.
Check out this video demonstrating the Florida or basket weave technique.
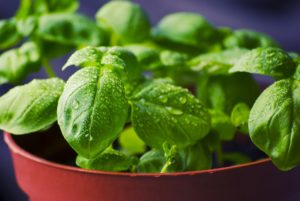
Fresh basil is one of the true treats of the garden. This sweet and savory herb can be used in anything from a fresh Caprese salad, a lovely pesto, or even chopped up as a flavor bomb on grilled meats and veggies!
However, it can be really hard to keep your basil productive, lush, and tasty throughout the summer. If you aren’t careful, your beautiful basil can become scraggly, short-lived, and bitter!
Don’t worry though. With these tips, whether it is classic sweet basil or spicy Thai basil you will have bushy, verdant basil all season long.
1. Sun is Basil’s Friend
Basil originated from subtropical areas of ancient India. Due to its roots, it loves a lot of sun and a lot of water. Make sure your basil is getting at least 6-8 hours of full sun every day. If you are keeping your basil in a container indoors, make sure that it is near a south-facing window.
Basil likes to be well hydrated, so make sure that you are frequently watering and that the soil is well drained. There is no set schedule you should be watering during, just keep an eye on the soil and water when it first appears dry.
3. The More You Take, the More the Plant Gives
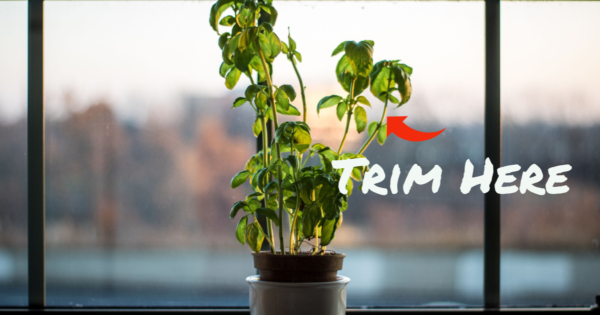
If left to its own devices, the basil plant will grow tall and spindly. Unfortunately, a tall skinny plant does not provide many leaves for you to munch on. To make the basil bushy and bountiful, you need to consistently prune and harvest from the plant.
The key to harvesting basil is to not just pick off the leaves. You want to cut or pinch off the leaves at the stem, right above a set of two leaves or nodes, like bellow. These nodes will create two separate branches, so make sure to leave at least one or two of these below the trim spot on the stem. If you keep this up every one to two weeks, you will have a massive, bushy basil plant by late summer!
When a leafy plant decides to produce seeds, it is known as bolting. Bolting, which often happens when the weather turns hot, is when the plant expects a period of high heat and little water, so it tries to produce seeds as quickly as possible. You can tell when your plant is bolting because it will have a period of rapid growth and flower production.
Once a basil plant goes to seed, the plant will start to wither away, and the remaining foliage will turn bitter and can take on an anise, or liquorice, flavor. If you let your basil get away from you, this can reduce your harvest season by months.
The easiest way to manage this is to cut off or pinch off any flower structures as soon as they appear. This will prevent the plant from bolting and, like with pruning, it will encourage the plant to branch off from where you trimmed it, making your plant even more productive and bushy.
https://bbbseed.com/wp-content/uploads/2023/11/BBB-Seed-logo-with-tagline-2023.png00Sam Dollhttps://bbbseed.com/wp-content/uploads/2023/11/BBB-Seed-logo-with-tagline-2023.pngSam Doll2018-07-24 10:38:042021-02-10 14:07:404 Tip for Keeping Your Basil Productive
Nothing is better in mid to late summer than the taste of a garden-fresh tomato. However, it takes a lot of hard work and care to help your tomatoes survive their perilous journey from seed to fruit. Here are nine common tomato diseases and what you need to do to treat them.
Fungal Diseases
Many common tomato diseases are caused by fungi. These diseases often are caused by specific environmental conditions like high moisture and certain temperature ranges. They are most often spread by contaminated soil or water and are usually manageable with vigilant prevention techniques and various fungicides.
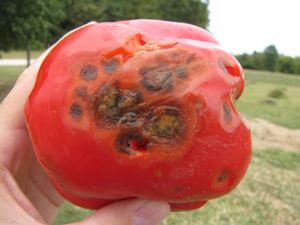
Anthracnose
What is it?
Anthracnose (Colletotrichum coccodes) is a fungal disease that primarily attacks the tomato fruits. It will affect both green and ripe tomatoes and will appear as small, sunken water-soaked area on the outside of the tomato.
As the disease progresses, the spot will widen and turn dark and expand. Infected unripe tomatoes will not show symptoms until the fruit ripens and the disease progresses faster the closer the tomato is to maturity.
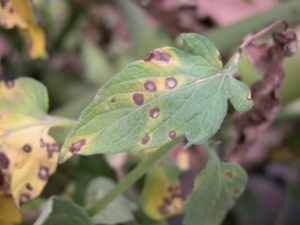
Septoria Leaf Spot
What is it?
Another fungal disease, Septoria Leaf Spot is caused by Septoria lycopersici. Unlike Anthracnose, Septoria attacks the leaves and stems of the plant but does not affect the fruit. The disease is more likely to appear on leaves closer to the ground and appears as the plant begins to fruit.
The primary symptoms are numerous round and small spots on the leaves that are dark on the outside and lighter in the center where the spore-producing bodies are. Highly infected leaves will yellow and fall off, which can expose the tomato fruit to the sun and cause sunscald.
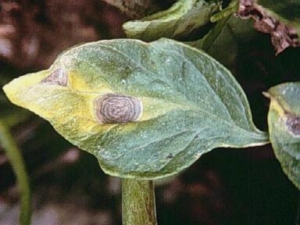
Early Blight
What is it?
Caused by the fungus Alternaria solani, Early blight affects older leaves and appears as a small brown spot with concentric rings. As it spreads throughout the leaf, it will cause it to yellow and wither. This can weaken the plant and expose the tomato fruit to sunscald and reduce yield.
The fungus can also attack the stem and fruit but is less common than in the leaves. It often progresses upward from the bottom of the plant.
Late Blight
What is it?
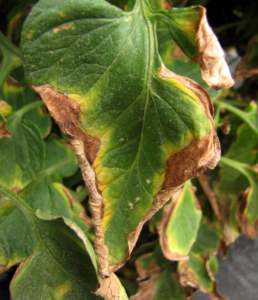
Late Blight (Phytophthora infestans) is a disease found in tomatoes and potatoes and is most infamous for causing the Irish Potato Famine.
Late blight thrives in humid, cool weather ( >90% humidity and <80°). It appears on all parts of the plant, usually starting on older leaves and then spreading to fruit and stems. It appears as a dark, water-soaked patch that will soon enlarge and grow a white moldy substance.
Late Blight is a slightly different beast than the other fungal diseases. It can move quickly through the garden and is spread by both water and wind. You can do all the prevention in the world, but a nearby garden with infected plants can blow spores over into your yard!
Use the treatment prescribed bellow but be prepared to pull and destroy plants if it spreads too far to save to rest of your garden and your neighbors’ gardens as well.
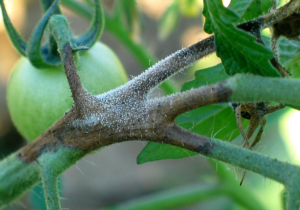
Fusarium Wilt
What is it?
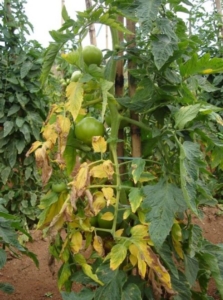
Fusarium Wilt (Fusarium oxysporum) is a warm-weather disease most common in southern regions. It appears as a wilting or drooping of the lower leaves, followed by the wilting and death of the entire plant. Oftentimes, leaves on one side of the plant will turn yellow.
The disease attacks the roots through the infected soil and will clog off the vascular system of the plant. It usually hits younger plants and there is no known treatment. The best way to prevent wilt to ensure that any soil or material you place in your bed is clean, including the soil from starts. There are also some disease-resistant hybrids.
The yellowing is a telltale sign, also check the soil. If the soil is dry, the wilt is most likely from lack of water. Water the plant to see if the wilting persists. If you are sure it is fungal wilt, the best thing to do is destroy the plant
Fungi thrive in warm wet environments. The spores are transmitted primarily from splashing water, either from rain or irrigation. Poorly drained soil, overwatering, and lack of air circulation around the plant can all create conditions for the spread.
To prevent most fungal diseases, only purchase certified disease-free seeds and don’t replant seeds from afflicted plants. Make sure your bed or container is well drained, do not overwater, plant the tomatoes in full sun. Space and stake or support the plant with cages to make sure that the plant can air out properly after watering. Also, avoid overhead watering to limit water splash, which would spread the spores
If you do see Anthracnose in your tomatoes, make sure to harvest the fruits as soon as they are ripe. Copper-based fungicides and a few organic fungicides can be effective for treatment of infective plants.
If you see infected leaves, feel free to remove them to help slow the spread of the disease. Make sure to wash your hands and tools after handling infected plant material.
After seeing any fungal diseases in your garden (besides Late Blight, which does not overwinter), make sure rotate your planting sites on a three-year cycle with plants that are not from the Solanaceae family (i.e. tomatoes, eggplants, peppers), which are closely related to tomatoes. Make sure to remove all plant material at the end of the season and do your best to keep the site weed free. If you do not have another planting site to rotate with, switch to containers instead.
The best prevention possible is to keep the plants as healthy and vigorous as possible. Like us, unhealthy or weak plants are more likely to get sick
Unlike funguses, which are multicellular organisms with complex cells (eukaryotes), bacteria are simple, single-celled organisms (prokaryotes). Bacteria are the most common form of life on earth and are, for the most part, harmless.
However, there are some bacteria that specialize in infecting and living in other species. These can be harmless, like the natural bacteria in your gut that helps you digest things like cellulose, but are sometimes dangerous, or pathogenic. Just like you can get strep throat from bacteria, your tomatoes are susceptible to them as well.
Tomato Pith Necrosis
What is it?
While mostly seen in greenhouse conditions, Tomato Pith Necrosis can occur during the early growing season in periods with cool temperatures and high humidity. Plants are especially susceptible in areas with high nitrogen levels, when the tomato starts are growing rapidly.
The first noticeable symptoms of this disease are usually wilted leaves followed by black lesions on the stems. As the disease progresses and the bacteria become more established in the stems, splits, cracks, shrinking, and other deformations are common.
If there are green fruit, the disease can cause a greasy, water-soaked spot on the blossom end of the fruit.
What do I do?
The best prevention of Tomato Pith Necrosis is to have control over your soil conditions. The main factor in pith necrosis is excess nitrogen in the soil. Don’t over fertilize early in the season and keep tabs on your soil quality.
Also, like with the fungal diseases, make sure your plants are properly spaced so they have room to breathe and dry out and avoid overhead watering.
If your plants do become infected, you can wait until warmer, dryer weather to see if they recover. If not, remove and dispose of them.
Make sure that you are rotating your plots on a three-year cycle and do not plant in plots that have had closely related plants like peppers. Do not put them in your compost because the bacteria can live on the diseased plant material for years.
Bacterial Spot
What is it?
Bacterial spot attacks the leaves and fruit of the tomato plant. It occurs during wet and warm conditions and can cause leave wilting, leaf and fruit spots, and defoliation. The leaves will show small and irregular spots as well as yellowing and browning as the disease persists. The fruit will have multiple dark specs that are dry and rough to the touch.
Fruit inflicted with Bacterial Spot, as with any diseased fruit, should not be consumed. While the disease itself isn’t dangerous to humans, it provides openings for dangerous pathogens to enter the fruit.
What do I do?
Spot often appears after heavy summer rainstorms. Make sure your plants are well spaced and pruned so they can air out effectively. Do not use overhead watering. If you are in an area where Spot has been seen, make sure you are cleaning your tools and rotating your plants. Preventative applications of copper-based fungicide can be effective in controlling spot.
If your plant does have Bacterial Spot, make sure that you immediately remove and dispose of it. Clean any tools you use with a 10% bleach solution or rubbing alcohol. Remove any plant debris.
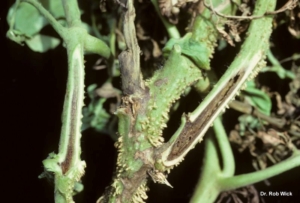
Bacterial Canker
What is it?
Bacterial Canker is one of the most difficult to identify and control tomato diseases once it takes hold. It can affect plants of all ages and has a variety of symptoms that are easily confused with other diseases.
Early symptoms are spots, browning, and wilting of leaves. Later symptoms include raised spots on the stems and fruit, which often include a white “halo” around a brown spot in the center. On older plants. The stems will show cankers or open “sores”. Once this disease takes hold, the plant is essentially doomed.
What do I do?
Prevention is the best defense against bacterial canker. Buy only certified disease-free seeds. Avoid overhead watering and space plants appropriately. Copper-based fungicides can be effective in prevention.
If you notice this disease on your plant, make sure to remove it, any plant debris and its neighboring plants immediately. Bag the removed plant material and dispose of it. Clean your tools and do not plant tomatoes on the site for a few years as the disease can live in the soil.
Viral Diseases
Viruses are pathogens that are usually a piece of genetic material surrounded by a protein. Not technically alive, these diseases are usually spread by “vectors” or living things that carry the disease. Think mosquitoes carrying West Nile.
Since each virus is spread differently, each will need its own prevention plan. There is no treatment for viral infections and the best course of action is often to remove and destroy infected plant material.
Mosaic Virus
What is it?
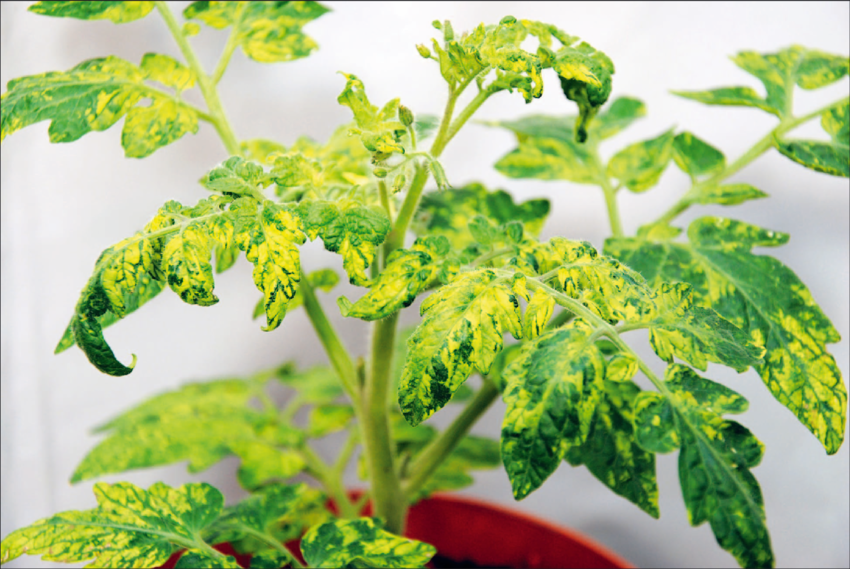
Mosaic Virus is a family of viruses that can affect tomatoes, peppers, and other plants in your garden. The most common one that might impact your tomatoes is the Tobacco Mosaic Virus (TMV), the Tomato Mosaic Virus (ToMV), and the Cucumber Mosaic Virus (CMV). Despite their names, all of these can seriously infect your plants.
The symptoms of both TMV and ToMV are varied and difficult to tell apart. The most common symptoms include irregular growth, strange leaf shapes, and mottled coloring in the leaves and fruit. You may still get yield from tomato plants infected with Mosaic Virus, but it will likely be stunted and fewer than you would have gotten normally.
CMV is spread by aphids and create a stunted, bushy, sometimes yellow plant with severe leaf malformation and mottling. Tomatoes with CMV produce very few fruits.
What do I do?
TMV and ToMV can be easily spread through touch and soil. Even handling tobacco products like cigarettes can contaminate your garden with TMV. Monitor seedlings closely for signs of the disease and make sure to remove any possibly infected plants.
If you are concerned at all, you can make a solution out of skim milk to spray the plants with. Proteins in the milk bind to the virus and make it unable to attack the plant. If you know you have handled any plants, wash your hands and tools with the same milk solution or soap and water to prevent transmission. The virus can live for over two years on surfaces and in the soil, so do not replant in soil that has been infected and make sure to remove all plant material from the site.
Since CMV is spread through aphids, the best prevention is to control the weeds in your garden to prevent aphids from jumping from plant to plant. Insecticides are not effective because new aphids can easily pick up the virus and spread it seconds from coming in contact with the plant. Surrounding the tomatoes with taller plants that are not attractive to the aphids can create a buffer and using aphid predators, like ladybugs, can keep the general population of aphids in check.
Tomato Spotted Wilt Virus (TSWV)
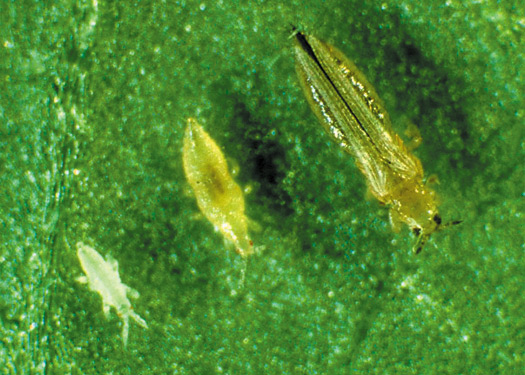
Thrip
What is it?
Tomato Spotted Wilt Virus (TSWV) is a highly contagious pathogen that can infect over 1000 different species of weeds, native plants, and ornamentals. It is transmitted through an insect pest known as thrips, which will feed on a variety of different plants.
The symptoms of TSWV vary from one variety of tomato to another, but often result in stunting and dead (or necrotic) spots on the leaves. They can also cause low plant yield, mottled fruit, and wilt.
What do I do?
Unless your garden is contained within a greenhouse, it will be difficult to control the spread of TSWV. The most effective management is to eliminate the weeds in your garden that can harbor thrips throughout the winter. Remove any remaining plant material and weeds, then till and mulch the garden for winter to remove any habitat for the thrips.
If you have plants that are infected with TSWV, you can remove it to prevent it from spreading the disease to nearby plants. Insecticides are relatively ineffective against thrips because applied insecticides are unlikely to come in contact with thrips on the plant and systematic pesticides are not fast enough to stop the thrip from infecting the plant. Insect predators like ladybugs, minute pirate bugs, and lacewings will all feed on thrips.
Tomato Yellow Leaf Curl Virus (TYLCV)
What is it?
Tomato Yellow Leaf Curl Virus (TYLCV) is a virus that is spread through seeds and whiteflies that causes yellowing and curling of leaves, stunting, flower drop, and severely reduced yield in tomatoes and peppers.
While TYLCV can be spread between seeds, the primary risk factor for your garden would be the spread of the virus through whitefly pests. Whiteflies are small, white flying insects that feed on the undersides of leaves.
What do I do?
Like TSWV, the best prevention is to keep whiteflies off of your plants. Do your best to keep weeds under control to limit available habitat for the whiteflies, till and mulch during the winter, and introduce natural predators. Products that use canola oil or horticultural oil can act as a whitefly repellent. For how to make your own, check out this article.
Another option you may want to consider is to use reflective mulches. These mulches reflect light back up at the plant and disorient insect pests.
If your plants do become infected with TYLCV you really only have two options. You can wait it out to see if you do get any harvest, and then remove all susceptible plants at the end of the season. The other option is to remove infected plants immediately to try to limit the spread of the virus.
When you do remove your plants, bag them as soon as you can to contain the whiteflies on the plant that are carriers for the virus.
Disease Prevention Checklist
Buy only disease-free seeds
Rotate your tomatoes and like crops on a three-year cycle
Make sure the plants are properly spaced and pruned so they can dry out properly
https://bbbseed.com/wp-content/uploads/2023/11/BBB-Seed-logo-with-tagline-2023.png00Sam Dollhttps://bbbseed.com/wp-content/uploads/2023/11/BBB-Seed-logo-with-tagline-2023.pngSam Doll2018-07-17 15:51:152021-02-10 14:09:43Guide to Common Tomato Diseases
How do you know it’s “officially” summer? Is it when the pool opens back up or your neighbors start grilling? For me, it doesn’t REALLY feel like summer until I can walk into my garden and eat a sweet snap pea off the vine!
While those pea pods are pretty tasty from the start, how do you know when the perfect time to pick them is? What if you want shelled peas, peas for stir fry, or even microgreens? We’ll help you figure out how and when to harvest your peas here in our Guide to Pea Harvesting.
Garden Peas
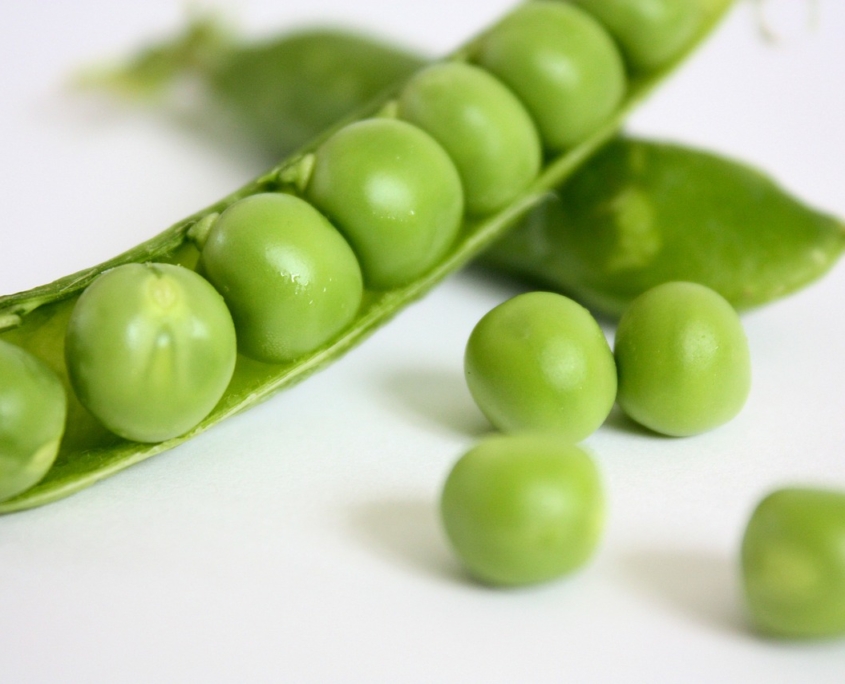
Garden peas, also known as English or sweet peas, are the classic pea, great for side dishes or soups. While this pea can be eaten whole when it is young and tender, it shines brightest when shelled.
When harvesting garden peas to be shelled, check for the pod to be bright green and rounded. It should be slightly shiny and have no visible bumps. If the pods have bumps from the peas getting too large, the peas may be over-ripe and could be too starchy or mealy in texture.
We recommend our Green Arrow variety of garden peas. They have a high yield (8-11 peas per pod) and are good tender as well.
Snow Peas
Snow peas are recognizable for having flat pods with very small peas inside. They are mild and sweet and are almost exclusively eaten whole. Great eaten fresh or in stir fry, snow peas can be some of the most delightful crops in your garden.
Since snow peas are meant to be eaten whole, it is better to err on the early side when harvesting. The peas should be small and a little loose in the pod. If they go too long, the pods will become fibrous and the crop will lose most of its sweetness.
Snow peas are also great for growing microgreens due to their quick germination. The shoots are sweet, crunchy and delicious. Harvest them when they are about 2″ long and use them as a garnish, add them to sandwiches, or mix them in salads and soups.
The Oregon Sugar Pod II (long name, great plant) is the perfect sugar pod for everything from microgreens to stir-fry.
Snap Peas
Snap peas, or sugar snap peas, have a plump, edible pod that makes for a classic summer snack. A cross between garden peas and snow peas, snap peas are best as a sweet, light snack but can also be shelled or lightly cooked.
Like snow peas, they can be harvested as early as you want to and as long as the pods are rounded and shiny. If they lose their shine or the pod begins to bulge where the peas are, they have gone too long to eat whole, but can still be shelled and enjoyed!
The more you pick, the more you get. It is best to keep harvesting peas as long as possible so you can get the maximum yield for your hard work.
When harvesting, use two hands to pick: one to hold the plant and the other to harvest. Peas are delicate plants and rough harvesting can do more harm than good.
Peas fix nitrogen in the soil which makes them best buds with corn. You can also plant your peas with bush beans, pole beans, carrots, celery, chicory, cucumber, eggplant, parsley, early potato, radish, spinach, strawberry, sweet pepper, tomatoes and turnips. Keep your peas away from chives, grapes, late potatoes and onions.
https://bbbseed.com/wp-content/uploads/2023/11/BBB-Seed-logo-with-tagline-2023.png00Sam Dollhttps://bbbseed.com/wp-content/uploads/2023/11/BBB-Seed-logo-with-tagline-2023.pngSam Doll2018-07-10 05:00:422021-02-10 14:13:34Guide to Pea Harvesting: When and How to Harvest Your Garden Grown Peas
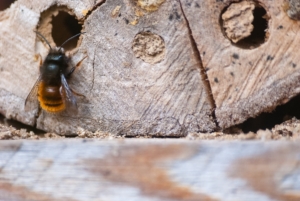
There are nearly 4,000 species of native bees in the United States alone! With the exception of bumblebees, nearly every native bee species in North America are solitary. They come in a variety of shapes in sizes, from enormous carpenter bees to the tiny Perdita genus.
Unlike European honeybees or bumblebees, solitary bees are stingless, do not have a queen, live in a colony, or make honey and wax. Instead, female solitary bees build tunnels to use as nests, where they lay their eggs in a series of chambers packed with a pollen and nectar “paste” for their young to munch on when they hatch. Since males will hatch and emerge from the nest first, the mamma bee will lay the females in the deepest portion of the nest and males in the front.
Around 70% of solitary bees are known as “mining bees” because they tunnel underground to build their nests. The other 30% of bees are cavity-nesting bees and will nest in anything from hollow or pithy stems to dead wood, or even abandoned snail shells!
Native bees are incredibly important pollinators. Unlike honeybees, which carry pollen in a “pollen pouch” on their legs, native bees are a bit less tidy, covering their whole bodies in pollen to carry it home. This messiness means they lose much more pollen as they go flower to flower and it actually makes them much more efficient pollinators. Some plants actually need native bees to be pollinated at all! Squash and gourds and any other members of the Cucurbita genus all rely on very specialized Squash Bees!
These bees are pretty neat! Here are some tips for Making your garden a native bee paradise!
1. Preserve and manage nesting sites
One of the most important things you can do to help protect your local native bees is to make sure that your yard is full of potential nesting sites. For mining bees, leave sunny patches of bare earth for nest sites and try to avoid laying down anything that could be a barrier (like landscaping cloth, gravel, or mulch) for bees accessing or emerging from potential existing nest sites. Also, leave unused areas of your garden with old wood, stones, or branches undisturbed as a cavity-nesting bee haven.
You can also install a bee hotel in your yard. Often made from wood or bamboo, these hotels are great for cavity-nesting bees like the Blue Orchard Mason Bee or Leafcutter Bee! You can build one yourself or buy them from reputable suppliers like our friends at The Bees Waggle.
2. Make your garden a bee buffet
To ensure that your garden is a Mecca for bees of all shapes and sizes, you need to make sure that there is a diversity of forage as well. Plant a mix of perennials and annuals so that you will have a mix of different blooms at the same time throughout the entire growing season. Also, try to have blocks of color in your garden so bees can easily find their way to the flowers they like over and over again, without having to hunt all around for them. Of course, native bees like native plants, so make sure to dedicate a portion (or all) of your garden to wildflowers. The Xerces Society has a variety of region-specific plant guides for pollinators that can get you started toward planting for native bees.
We did the hard work for you and made our Bee Rescue Wildflower Mix that will provide great season-long forage for both native and honeybees!
3. Lay off the pesticides
Pesticides can’t discriminate between the bad and good bugs. These insecticides pose a particular danger to mining bees since they are often applied to bare ground areas around structures that are ideal nesting sites for these bees. These insecticides also pose the risk of washing into other areas of the garden and contaminating nest sites.
Neonicotinoids, or neonics, are systematic pesticides that live inside the plants that they are trying to protect. These have been particularly harmful to our various pollinator species because they work their way up through the plant into the nectar and pollen that various pollinators are attracted to. Flowers with neonics applied are actually luring bees and other insect pollinators to their deaths!
One of the most important things your can do to protect native bees is to learn! Take some time to watch all the bees that visit and live in your garden. Visit the Xerces Society website and use their identification guides to try to figure out which bees you are seeing. Most importantly, SPREAD THE WORD! Educate your friends and family about all the bees that don’t make the nightly news and how vital they are to our future!
Other Resources
Check out these resources for more about pollinators and how you can help them
The Bee Lab – An incredible research lab at the University of Minnesota run by Dr. Marla Spivak, MacArthur Fellow and Distinguished McKnight Professor in Entomology
The Pollinator Partnership – Nonprofit dedicated to promoting the health of pollinators through conservation, education, and research.
https://bbbseed.com/wp-content/uploads/2023/11/BBB-Seed-logo-with-tagline-2023.png00Sam Dollhttps://bbbseed.com/wp-content/uploads/2023/11/BBB-Seed-logo-with-tagline-2023.pngSam Doll2018-06-22 12:18:192021-02-10 14:31:28Gardening for the Native Bees: 4 Easy Tips For Making Your Garden Solitary Bee Friendly
Bees are responsible for at least one-third of our diet! Since these busy little creatures are so important to the food we eat, we thought it would be nice to spice up their diet (as well as ours) with some ideas to make a bee-friendly pollinator garden!
Here are a few herbs that you and the bees will love to eat this summer
Great for giving that classic flavor to meats and, if you are daring, can be a great addition to some classic adult beverages (check out this Sage Bee’s Knees Cocktail). Sage is a hardy perennial that loves well-drained soil and lots of sunshine, which means it does great in a container. This herb also preserves its flavor past flowering, which means it can feed you and the bees at the same time!
A perennial herb native to the Mediterranean, with a wonderfully gentle lemon scent in the mint family. The fragrant, inconspicuous but nectar-rich white flowers will attract honey bees. Leave the blooms for the bees for a couple of days, then trim them off to prevent self-sowing. Lemon Balm is often used as a flavoring in ice cream and lemon balm pesto and in herbal teas. Use the fresh leaves in chicken or fish dishes as well as with fruit and fruit juices. The same goes for any member of the mint family (peppermint, spearmint, and catnip included). Basil: Sweet, Thai, cinnamon, lemon, lime, purple, and Christmas are just a few of the basil varieties available to you. Basil is a versatile and easy to grow herb that originated in tropical Asia and has been cultivated for thousands of years. This warm-weather annual has a refreshing, aromatic flavor that makes it a classic ingredient of many Italian and Southeast Asian dishes. Try using it in a classic Thai basil Soup. Make sure to trim the flowers before they go to seed to prevent the flavor from changing.
An easy-to-grow, drought-tolerant herb used to flavor food, as an antiseptic, and in essential oils. The leaves of this warm, pungent spice that can be used fresh or dried in many dishes, marinades, and sauces. For an easy dish, try this oven-roasted potatoes and carrots with thyme recipe. Thyme will attract both bees and butterflies!
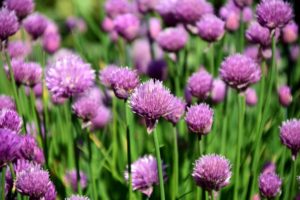
The surprisingly beautiful chive blooms are as tasty to the bees as they are to us! The blossoms are oniony and spicy. They are often used to make chive blossom vinegar, which is often used in salad dressing, or just can be chopped up and added to any savory dish for some flavor and color!
The most timeless and versatile garden flower around, lavender flowers and leaves can be used in everything from homemade cosmetics to confections. It is especially nice to use in a simple, homemade sugar scrub. The blooms are perfect for attracting all the neighborhood honeybees.
Other great pollinator-friendly herbs are bee balm, chicory, dill, fennel, hyssop, and rosemary.
https://bbbseed.com/wp-content/uploads/2023/11/BBB-Seed-logo-with-tagline-2023.png00Sam Dollhttps://bbbseed.com/wp-content/uploads/2023/11/BBB-Seed-logo-with-tagline-2023.pngSam Doll2018-06-08 13:53:242021-02-11 11:21:57Herbs for the Bees
If you purchased seedlings such as vegetables or annual herbs and flowers there are a few things that you have to keep in mind for the care and planting of seedlings. They are way too tender to be planted outside unless they are “hardened off” and if they came from a nursery or greenhouse that has definitely not happened yet. Here are some guidelines to follow:
• Place them in a spot indoors where they can get at least ten hours of sun or use grow lights to keep them healthy.
• Move them outdoors gradually so they are exposed to sun and wind over a week to ten days (This is what is known as hardening off).
• Start slowly when temperatures are above 60 degrees and only leave them in the sun for 1-2 hours. Then move them into the shade if the temperatures continue to be mild enough.
• Increase the amount of sunshine each day and gradually expose them to more sun in 2-hour increments each day.
• Be aware of the last frost date in your area. Don’t plant until after that date and be prepared to cover them if the weather gets cold and snowy.
• Don’t forget to check your seedlings at least once a day for signs of wilting and water them well. Small pots with new seedlings can get dry very quickly.
https://bbbseed.com/wp-content/uploads/2023/11/BBB-Seed-logo-with-tagline-2023.png00Engrid Winslowhttps://bbbseed.com/wp-content/uploads/2023/11/BBB-Seed-logo-with-tagline-2023.pngEngrid Winslow2018-05-01 14:04:422021-02-11 11:36:58Care and Planting of Seedlings
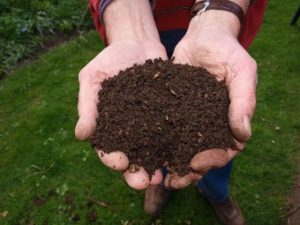
Let’s talk about getting your vegetable and flower beds ready for planting by preparing the soil. No matter how great your soil seems to be, your new plants will welcome a boost of vital nutrients. Tomatoes, onions, peppers and other vegetables are known as “heavy feeders”. This means they need (and therefore remove) lots of minerals from the soil they grow in. Without fertile soil, many plants will struggle to produce those tasty fruits and vegetables, and beautiful blooms.
5 Tips to Improve Your Soil
1. Add compost: Make your own or purchase a quality one such as mushroom compost. You may also like chicken manure based, beer industry bi-products or even dairy cow manure. Avoid compost made from curbside recycling (who knows what is really in there) or anything with steer manure, usually very high in salt. Spend a little extra on better quality and your garden will thank you with beautiful vegetables and flowers.
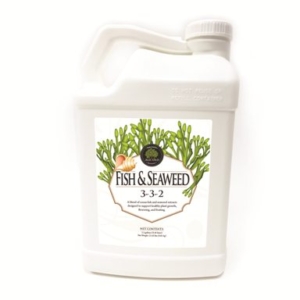
2. Use fertilizers: A mild, organic fertilizer is best and can range from fish emulsion to compost tea or kelp. Seek out a liquid fertilizer that is a balanced mix of nitrogen, phosphorus and potassium. Look for a label with low numbers for each of these 3 minerals. See below for an example (3-3-2).
3. Cover the soil all year: Use mulch (shredded leaves are perfect) and cover crops when you are not growing vegetables. This will help keep weeds at bay and adds nutrients to the soil.
4. Rotate vegetables: Don’t grow the same vegetables in the same place every year, especially those “heavy feeders” (mentioned above). It’s best to give the soil a three-year break between them to avoid diseases and soil depletion. Remember that some crops (peas and beans in particular) actually add nutrients to the soil they are grown in.
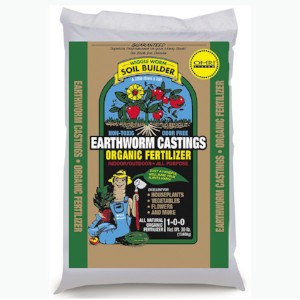
5. Encourage worms: Worm castings are expensive but have such great qualities that even a little bit is well worth it. The more you amend your soil over time, the better it becomes and somehow worms find their way to worthy soil.
https://bbbseed.com/wp-content/uploads/2023/11/BBB-Seed-logo-with-tagline-2023.png00Engrid Winslowhttps://bbbseed.com/wp-content/uploads/2023/11/BBB-Seed-logo-with-tagline-2023.pngEngrid Winslow2018-04-06 15:14:532021-02-11 11:41:18The Importance of Soil
There are lots of professional landscape designers out there who can help you put together beautiful flower beds but most of us are on a budget that won’t accommodate such wonderful swaths of elegant beds. So, for the rest of us, here is, garden design 101, a few basics to consider when planning your spaces for lots of color for as long as possible.
Tall in Back, Short in Front
This is one of the three basic rules in landscape design that you should consider when deciding what to plant where. This stems from the traditional English Cottage Garden look with Hollyhocks, tall grasses and climbing roses in the back and shorter flowers, (such as poppies) in the middles and even shorter ones (think thyme or even trailing plants like nasturtium), closer to the front.
Color Combinations
Get out that school color wheel for some great ideas of combinations that are either across or next to each other. Some personal favorites are the unexpected ones, like orange and purple next to each other. If you prefer pastels, then pinks and pale blues and yellows are the way to go. Don’t neglect white because you don’t think that it is a real color. It highlights and adds accent next to some colors (such as red) and adds softness to blues and pinks.
Bloom Time
If you want color in your flower beds all year long you have to think about when they bloom. Some of the earliest flowers can be provided by Hellebores, Snowdrops, Crocus, Iris and early Daffodils (there are a huge range of choices in bulbs from Daffodils that will begin in early March and continue into late April and the same goes for some of the more “wild” or “species tulips”) and the later ones being Sunflowers, asters and repeating roses. There are options for all season bloomers such as pincushion flowers and the Frikartii Asters. In the heat of July you can depend on Hummingbird Mint, Coneflowers, and Rudbeckia to provide cheerful blooms. Don’t forget to include grasses which can also range in the times when their inflorescences are at their peak depending on whether they are cool or warm season “bloomers”. Grasses also create interest in the garden during the winter and provide food for small birds.
A Couple of Other Suggestions
Consider planting in groups of odd numbers rather than just one plant which creates swaths and clumps of color.
Repeat some of these groups several times in several places throughout the garden to give a sense of continuity.
Use a larger perennial, some half-buried rocks or a shrub to anchor the scene.
Add some annual flowers such as sunflowers, zinnias and annual poppies which bloom for a long time in bright, vibrant colors.
Do you have limited space to grow your vegetables in? Small yard, only one raised bed, or even just containers on a porch or deck? Way back when (1981, in fact), PBS ran a series of shows with Mel Bartholomew which showcased how he divided a 12-foot x 12-foot plot of raised or in-ground vegetable gardens into squares. There were many different possibilities for square foot gardening in the size of these areas by making some of the squares either larger or smaller but the basic idea was to figure out how much room was needed for each type of plant and to adjust the squares accordingly. For example, you might want more tomatoes and less lettuce or vice versa and would change the sizes of the squares to your personal preference. Some plants can be planted closer together which results in a more dense area of vegetables that maximizes space. The net result from gardening in this manner showed that the veggies were less expensive, used less water, took up less space, used fewer seeds and required less work on the gardener’s part as the squares were easier to reach and did not need as much weeding. All in all, for gardeners with limited space, consider dividing your veggie beds into sections with your family’s favorites as you dream of all of those seed choices and plan your 2018 garden. The original book that started the revolution is still in print and there are several others with additional tips and tricks including one just for gardening in containers.
We may request cookies to be set on your device. We use cookies to let us know when you visit our websites, how you interact with us, to enrich your user experience, and to customize your relationship with our website.
Click on the different category headings to find out more. You can also change some of your preferences. Note that blocking some types of cookies may impact your experience on our websites and the services we are able to offer.
Essential Website Cookies
These cookies are strictly necessary to provide you with services available through our website and to use some of its features.
Because these cookies are strictly necessary to deliver the website, refusing them will have impact how our site functions. You always can block or delete cookies by changing your browser settings and force blocking all cookies on this website. But this will always prompt you to accept/refuse cookies when revisiting our site.
We fully respect if you want to refuse cookies but to avoid asking you again and again kindly allow us to store a cookie for that. You are free to opt out any time or opt in for other cookies to get a better experience. If you refuse cookies we will remove all set cookies in our domain.
We provide you with a list of stored cookies on your computer in our domain so you can check what we stored. Due to security reasons we are not able to show or modify cookies from other domains. You can check these in your browser security settings.
Google Analytics Cookies
These cookies collect information that is used either in aggregate form to help us understand how our website is being used or how effective our marketing campaigns are, or to help us customize our website and application for you in order to enhance your experience.
If you do not want that we track your visit to our site you can disable tracking in your browser here:
Other external services
We also use different external services like Google Webfonts, Google Maps, and external Video providers. Since these providers may collect personal data like your IP address we allow you to block them here. Please be aware that this might heavily reduce the functionality and appearance of our site. Changes will take effect once you reload the page.
Google Webfont Settings:
Google Map Settings:
Google reCaptcha Settings:
Vimeo and Youtube video embeds:
Other cookies
The following cookies are also needed - You can choose if you want to allow them:
Privacy Policy
You can read about our cookies and privacy settings in detail on our Privacy Policy Page.