I have had many inquiries on this topic, and I would like to post some solutions for you to use as an alternative to poisons.
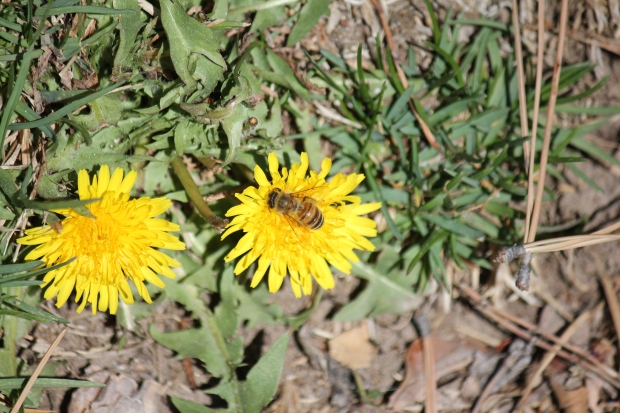
Weeds do have value to pollinators, as most produce blooms that carry highly nutritious contents for pollinators. However, they can be overwhelming in their growing power, and we need ways to control them without poisoning the soil and the things that feed on them. I would like to begin by saying I pull each and every weed that I do not want growing in specific places. I never use chemicals, not even vinegar and salt. I would like to urge you to do the same, but I am providing you with some choices that are nontoxic.
Boiling water. Pouring boiling water over weeds cooks them, and kills them. Water is only water, so it’s okay for it to get into the soil and groundwater.
Spray straight White Vinegar on the leaves of weeds being careful not to go overboard. Too much vinegar in the soil isn’t good for the pH of the soil so it will affect the balance of the existing underground ecosystem if it is applied excessively.
Spray a mixture of salt and vinegar…and then maybe pull them, roast them, and eat them? Just a joke. The recipe is 1 cup of salt into 1 gallon of vinegar
Wasps, hornets, and yellow jackets are the other most popular topic of seasonal pests. I don’t consider them much of a pest because they eat other insects, which makes them a very important part of the food chain. So, instead of finding ways to kill them, I find ways to coexist. They do not like peppermint oil, lavender oil, or eucalyptus oil. So, the best prevention is to spray a mixture of these oils with water around the areas you’d rather them not set up shop. The recipe is as follows: 1 tsp of peppermint oil; 1/2 tsp lavender oil; 1/2 tsp eucalyptus oil into 2 cups of water. Use a good spray bottle to apply this mixture anywhere you do not want them present. I suggest daily application, and the smell is pleasant, at least I think so.
Remember that every living thing has a purpose, so frugally controlling them is in our best interest! I hope you all are having a wonderful summer so far! Thank you for being part of this very important movement to save our bees!
Jessica
Here are a couple of links to steps to control pests using non-chemical controls and least toxic methods, and a link to a great video from BeyondPesticides.org website.
https://bbbseed.com/wp-content/uploads/2023/11/BBB-Seed-logo-with-tagline-2023.png00Mike Wadehttps://bbbseed.com/wp-content/uploads/2023/11/BBB-Seed-logo-with-tagline-2023.pngMike Wade2016-06-24 08:00:592021-02-23 12:23:10Natural Weed and Pest Control
Most of the visitors to our Facebook page and website are already among the converted. We know how important pollinators are and we’re doing everything we can from avoiding pesticides to planting pollinator gardens in hope of preserving our pollinators.
Sometimes as activists for the things we feel passionate about, we human beings have a tendency to make the people who oppose our opinion into our enemy. The reality is that right now, everyone isn’t going to quit using pesticides no matter how much we want that. We all have spouses or neighbors or friends who are going to use pesticides no matter what we say. Garden and tree businesses are going to spray. So what the North American Pollinator Protection Campaign (NAPPC) is doing is bringing together government agencies like the EPA, pesticide manufacturers, licensed pesticide applicators, and non-profits like beekeeping associations to develop guidelines to teach pesticide applicators how to choose pesticides and how to spray while causing the least harm to bees and pollinators that end up as collateral damage.
A couple of obvious things pesticide users can do:
Schedule your pesticide application when bees aren’t active. Saturday morning or in the evenings after dinner before dark are the worse time to apply pesticides. Bees and pollinators are foraging then and likely to get sprayed or eat pollen or nectar that has just been sprayed. For some pesticides, simply applying it at night protects the pollinators while still killing the pests. You have to wake up before the bees or stay up after they go to sleep.
Plan your pesticide applications when plants aren’t in bloom. This isn’t always possible but some bloom times are short and you might find that waiting another week until the bloom is finished will still kill your pests and protect the pollinators.
Avoid drift and runoff.
Don’t spray on windy days. The wind carries the pesticide into neighboring areas or into your nose and eyes.
Don’t spray when it is about to rain. Many pesticides will dry within a few hours of application and be less toxic to pollinators. If you spray when rain is coming, those pesticides are going to be washed away into storm drains or rivers.
Keep the pesticide spray on the problem area….don’t keep spraying the rocks or sidewalk because you’re walking from one area to another. Use only as much pesticide as needed to achieve your goal. Drenching everything isn’t necessary.
Read and re-read labels. The formulations of your favorite pesticides can change Some are very toxic to bees. Others are only toxic under certain conditions. Know exactly what you are spraying and how it affects bees.
Pesticide applicators aren’t out there spraying because they hate bees. They want to get rid of their pests in the most efficient way. Print out this brochure for friends and neighbors and even companies you see applying pesticides. Help the people who INSIST on using pesticides learn that they can still protect pollinators.
It’s only the beginning of June, but hot days can already cause your lettuce to begin to turn bitter or bolt. But an attentive gardener can keep her lettuce sweet and tasty with a few easy tricks.
Lettuce generally turns bitter when it begins to mature or bolt. The most obvious environmental factors that cause bitterness are high heat and water stress. There are some studies that suggest long day length also speeds bolting. It’s a bit too much trouble to test this and create darkness for your lettuce but there’s a lot you can do to sweeten your lettuce.
Keep it cool.
Light row cover over the lettuce in the easiest way to cool it down. Just keep the sun from baking it. Alternatively next year you can plant the lettuce somewhere it gets shade in the hottest parts of the day.
Keep it well watered.
Sometimes we don’t notice how hot it is becoming and we don’t increase our watering to compensate. Make sure your lettuce is consistently well watered and doesn’t go through stressful too wet/too dry cycles.
Thin your lettuce.
Loose leaf lettuce can get bitter from being planted too densely and not thinned. This is probably just water and nutrient stress from overcrowding, but give those plants a little more room. By thinning as lettuce grows.
Pick it in the morning.
A cool night is often enough to sweeten lettuce so pick the lettuce in the cool of morning, not just before dinner. Bring a bucket of water with you to harvest and put the lettuce directly into the water after picking.
And if your lettuce is already bitter?
No need to eat it bitter or toss it into the compost pile. Wash and dry the lettuce and put it in a crisper in the refrigerator for at least a few hours and up to a couple of days. Lettuce is one of those plants that keeps growing even after it is cut so it will often respond to its new cool humid environment by “sweetening up.”
If your lettuce is still bitter? Send it to compost or toss it in with other vegetables when juicing. You’ll get the vitamins but not notice the bitterness amid the other strong vegetable tastes.
Many gardeners choose to grow plants in containers for the ease of planting and for the convenience of placing the containers anywhere they want. Maintaining healthy plants in a container garden is no different from plants in a garden.
However, container plants need more care. Taking care of them slightly differs from regular plants. They have limited soil volume and are subject to more stress than garden plants which requires constant monitoring for pests. If you’re looking to save time and the stress of having to find the pests that may of intruded into your garden. It could it be worth checking out the best home security camera deals on the market to make finding the pests and what they’ve left behind easier for you.
You must regularly inspect the foliage, bloom, and fruits to find out signs of infestation. You must also examine the underside of the leaves and stems as some insects hide in those places.
If the plants have any infected or dead leaves, you must immediately remove them. If you find few yellow leaves are on the bottom of the stem, do not worry as they naturally occur when the plants grow.
Mix a few drops of mild detergent in water and wash the foliage. Container plants will benefit from this if you repeat it every month.
If the infestation does not respond to soapy water, you may have to use commercial pesticides that are designed to control specific pests. These days manufacturers offer alternatives to chemical pesticides so visit the local store and buy the products if infestation continues. While using such products, you must always follow the instructions, and they must be kept out of reach of children.
To avoid pest infestations, do not reuse the soil especially if the plants were affected by bacteria. Even though the soil looks fine, it might be contaminated or have insect eggs which are hard to see. This infographic on natural pest control methods can give you the ideas to get it done on your own. However, if you would prefer to get some professional help, rather then do it by yourself, then you could always check out someone like pest control Des Moines.
Clean containers will be helpful to prevent problems. When you are going to start a new planting, scrub the pots and containers using liquid detergent and water. To reuse an infested pot, soak it in a solution of one part household bleach to ten parts water for about an hour. Rinse all the pots thoroughly and dry them in sunlight before planting. Keep in mind that the area around the containers should also be clean as dirty surroundings is a way through which pests attack plants. After using the tools to treat the infested plant, thoroughly wash them, before you use it on other plants.
Healthy plants can fight off pests that attack them. So make sure you give the plants adequate sunlight, organic fertilizers, and water. There must be proper space between plants so that there will be enough air circulation. If pests infest a plant, keep them away from the rest of the plants because they will infest the healthy ones too.Many pests infect container grown plants especially spider mites. Stressed plants are most likely to be attacked by pests than healthy ones. So regularly monitor plants so that you will be able to detect problems in the early stages.
[http://i.imgur.com/RXdrB4W.jpg] (Plants in containers)
https://bbbseed.com/wp-content/uploads/2023/11/BBB-Seed-logo-with-tagline-2023.png00Mike Wadehttps://bbbseed.com/wp-content/uploads/2023/11/BBB-Seed-logo-with-tagline-2023.pngMike Wade2016-04-20 12:02:262021-02-23 15:53:51How To Deal with Troublesome Pests In Container Gardens
I was chatting with a local bird habitat specialist hoping for some tips on what I could plant or build that would attract more birds to my new garden. I was surprised as she struggled to think of flowers that might work. Then she blurted: “The biggest obstacle to birds in the garden is the humans.” If the humans would just quit “improving” the garden, more birds would automatically come.
Don’t deadhead so much.
She elaborated, the first most important thing to do for birds is to quit deadheading so much and leave the seed heads of spent flowers on the plant so the seeds can mature. You can do some deadheading to keep your plants making more flowers, but especially at the end of the plant’s season, you need to leave the seeds on. I used to throw the seed heads into a corner of the garden near a bird feeder, but I learned that birds don’t like to eat off the ground unless they are desperate. They like to land on the top of the seed stalk and bend over and pull the seeds out one by one. Up on top of the plant, they feel safer from predators and can fly off at a moment’s notice.
Learn to Tolerate Some Pests
The other mistake gardeners make that discourages birds is being too diligent about getting rid of all the pests and larvae in the garden. Leaving some pests may damage a few plants, but birds need caterpillars and bugs in the spring to feed their hungry babies. A pest-free garden is not a healthy habitat. And you won’t have to worry about the pests overtaking your garden in most cases because the birds are going to eat them!
So to attract more birds to your garden, let your garden look a little more unruly. I did get a couple of plant ideas of seeds birds particularly like: coreopsis, sunflowers, coneflowers and cosmos are all seed heads that birds consider especially yummy.
https://bbbseed.com/wp-content/uploads/2023/11/BBB-Seed-logo-with-tagline-2023.png00Sandy Swegelhttps://bbbseed.com/wp-content/uploads/2023/11/BBB-Seed-logo-with-tagline-2023.pngSandy Swegel2016-04-15 13:32:452021-11-29 11:31:10Two ways to have more birds in your yard
Our local garden club invited a rose expert from Jackson and Perkins to give us some winter inspiration this week. Rose growers are like tomato growers….they have their own little secrets and rituals to make their roses the best and the biggest. Our expert showed us pictures from his own garden that made me a believer in kelp. His plants treated with kelp and fertilizer were bigger and more robust than plants treated with just fertilizer If you are going to use soil amendments in your garden, kelp should be at the top of the list right after organic fertilizer.
So what does kelp offer?
Sea Minerals.
Kelp and other seaweeds are good sources of trace minerals that are often deficient in ordinary garden soil. So kelp is a good ingredient as a fertilizer…but not a substitute for your regular fertilizer.
Plant Growth Hormones.
OK, this is the real reason gardeners love kelp. Its natural plant growth hormones (cytokinins) stimulate extra growth in our plants and in our soil microbes. This is the “secret weapon” part of using kelp in your garden. Kelp stimulates roots, plant growth, flower production by virtue of the hormones even more than because of the vitamins and minerals.
Plant Health and Resilience.
Plants treated with kelp showed more drought resistance and bug resistance. Aphids, in particular, don’t like the taste of kelp and avoided kelp sprayed leaves. Anecdotally, I have found that a kelp foliage spray reduces powdery mildew.
How to Use Kelp
Kelp comes as kelp meal and as a liquid. An interesting thing about kelp is that when you apply kelp changes what kelp does for your plant. If you want sturdier roots, add kelp meal when planting to stimulate root growth. If you want more flowers on roses or tomatoes, apply it as a spray when your plants were budding. (Thanks researchers from the marijuana industry for these studies.) Some tomato growers use kelp weekly once tomatoes start to flower. If you are trying to improve your soil, apply meal or liquid to the soil once soil temperatures are above 60 or so when soil microbes are active. I like to use a weak kelp liquid spray weekly during hot spells in summer and spray all over the tops and undersides of leaves. It perks the plants up and gives the garden a lovely ocean smell. Plants absorb kelp better through leaves than through roots.
How Not to Use Kelp
More kelp isn’t better than small amounts of kelp. Don’t just throw it on your garden thinking more is better. Think about what effect you want. Do you want more tomatoes? Then applying kelp when the tomato is growing leaves but not making flowers yet will give you more leafy growth, not more tomatoes. On the other hand, a little kelp spray on your greens will increase the number and vitality of leaves.
Do Your Own Experiment
If you are going to add kelp to your repertoire, try a science experiment. Select a plant that you give kelp to and one a little further away that doesn’t get kelp. Do they behave differently?
https://bbbseed.com/wp-content/uploads/2023/11/BBB-Seed-logo-with-tagline-2023.png00Mike Wadehttps://bbbseed.com/wp-content/uploads/2023/11/BBB-Seed-logo-with-tagline-2023.pngMike Wade2016-03-18 14:36:202021-02-23 16:27:52Kelp: A Gardener’s Best Friend
St Patrick’s Day is this week…a traditional day for planting peas. But you know that….so get ready to plant your peas. This year I’m thinking about Ireland and two plants usually associated with Ireland: cabbage and clover (not necessarily the four-leaf variety.) A little internet browsing led to an interesting connection to these two plants. One…they both like to grow in cool humidity like Spring and Fall. Cabbage is a cool season crop. Two… old country wisdom and modern science show that cabbage and clover are excellent companion crops.
Books in England dating back to the 1700s recommend cabbage “Husbandry” the old word for farming. Cabbage was highly regarded because it lasted well as a stored food for winter and because cows and sheep that ate cabbage in the winter made sweeter milk than those that ate turnips. Standard practice in England in the olden days was to plant a clover cover crop and follow that with cabbage or potatoes. Turns out that cabbage that grows in clover or where clover had been grown and tilled under are larger and have significantly fewer pests included the cabbage looper. Cabbage moths are still the bane of cabbage growers. Modern no-till farmers have adopted this centuries-old wisdom to plant cabbage right into a field of clover.
Besides being good for cows and sheep, cabbage is healthy for us and a staple in many cuisines. I am particularly fond of the red cabbages because they are pretty! Here are a few tips to grow cabbage:
It’s a cool season crop.
That means you have to get it in early. Or plant it in mid-summer for fall harvest.
They do well from transplants.
Start seeds indoors or in a cold frame 8 weeks before last Spring frost. Then transplant it about 2-4 weeks before last Spring frost. Cabbage is a “heavy feeder” so you need good soil or extra fertilization and regular irrigation.
Watch out for pests.
Cutworms and cabbage loopers love cabbage too…but they are pretty easy to pick off if you stay after them. Little paper collars protect transplants from the cutworms. If you don’t like to pick off the worms, it is good organic control.
Cabbage makes great microgreens.
Cabbage germinates in about two days in your warm kitchen. Another superfood from the brassica family.
For more on the science of winter-sowing clover and cabbage and other brassicas
http://www.ctahr.hawaii.edu/oc/freepubs/pdf/IP-27.pdf
http://www.modernvictorygarden.com/apps/blog/show/2015631-in-praise-of-cabbages
http://microgardening.newearthmicrogreens.com/red-cabbage-microgreens-vitamins/
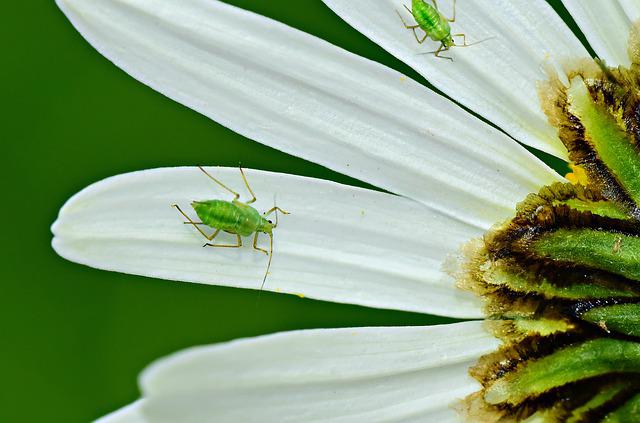
We got a great question from a customer this week about controlling aphids. Her frustration resonates with most of us who garden.
Q. Aphids are terrible, tiny creatures and I fight them every year. I’ve been looking for the best ways to make sure they don’t screw with my garden this time. I thought I had a good way; planting garlic around the plants. “Aphids don’t like garlic,” one link said. “Aphids love garlic leaves, said another one. Soap mixture, Neem oil, rubbing alcohol mixed with soap and water, importing good bugs that love to eat the aphids. I refuse to use chemicals that poison everything, it makes growing organic pretty pointless. Does anyone have any SURE FIRE, tried, and true methods?
A. The key to reducing aphids in your garden is to understand their lifestyle. Controlling them is like cleaning the house. You can’t just clean a house full of people once and expect the house to still be clean a week later if you didn’t keep picking up stuff all week. When you use any treatment you might kill most of the adult aphids that day. But the ones you missed or who were eggs that wouldn’t hatch for another day, are still eating and reproducing. Reproduction is the key to aphid success. They reproduce both sexually and asexually. They lay eggs to survive the winter. And they have live births in warm weather. Each one can create up to 100 new aphids per month.
My best sure-fire, tried and true method (or as close to that as one can get) is this:
Accept that you are going to have some aphids. To kill them all, even if possible, means you would also kill all the beneficial insect pollinators and you don’t want to do this.
Understand how aphids die. Warning: graphic content ahead.
It is super easy to kill aphids, which is why plain water spray works great. Aphids feed by attaching to the plant with their mouths. When you spray water on the aphids, the force of the water tears the aphid off the plant. The head and mouthparts stay attached to the plant, instantly killing the aphid. Even just brushing off all the aphids on a leaf with your finger decapitates and kills all those aphids. That’s why you don’t have to poison them…if you can just mechanically remove them.
Be vigilant (every few days) about checking for aphids.
New aphids are hatching in leaf litter or being birthed by the aphids who were hiding out in the weeds next door. You have to spray the aphids every time you see them in large numbers. Each aphid can have dozens of generations…They are baby-making machines. You have to keep after them at least until you see you are no longer getting infestations.
Be careful not to eliminate beneficial insects. There’s yet another reason not to try to kill off aphids outside, even with “safe” organic treatments like soapy water. If you kill the aphids, the aphid-eating wasps, another of those native beneficial insects, won’t have anything to eat and they’ll leave your garden. They are eaten by so many beneficial insects that it’s rather amazing that we see any at all. Yet there are so many on our plants at times.
This week I’m seeing thousands of them on the new growth of roses. And while my first instinct is to kill them in some way, I have finally learned to just watch them. I know what I am seeing is a mini-population explosion that will usually be followed in a week or so by mini-population explosions of predators that eat aphids. If we try to kill off the aphids which are at the bottom of the beneficial insect food chain, then the beneficials will fly away to another garden.
I knew about many of the predators of aphids like ladybugs and lacewings, but I learned yesterday that tiny native aphid-eating wasps eat a LOT of them. In addition to wasps that just eat the aphids, there are parasitic wasps that lay their eggs inside of them. When the eggs hatch the tiny larvae eat their way out of the aphid. A bit gory, but effective in guaranteeing enough food for baby wasps.
So I challenge you to a two-week experiment. Let the aphids be when they show up and just watch the plants for a few days. See who shows up to dine on them. Some possibilities include wasps, both large and small, hoverflies, ladybugs, and lacewings. It will be a fascinating discovery of how many small beings live in your garden, there to help you keep everything in balance.
Nature does provide a natural balance if you have a healthy garden that supports beneficial insects. If you are aggressively treating aphids with garlic or neem sprays, you are also killing all the other insects that eat aphids.
Alter the conditions in your garden that reduce the number of aphids.
Don’t over-fertilize. Aphids love nitrogen. You will get a little aphid bloom every time you add nitrogen to your plants. Reduce the nitrogen and you don’t have so many of them.
Encourage earthworms and use earthworm castings. Earthworms produce an enzyme chitinase to help digest their food. Aphids are repelled by chitinase. Unfortunately, the chitinase doesn’t last long enough to be the only deterrent.
Encourage good environmental conditions like airflow and temperature. This works really well indoors. In my greenhouse, I can reduce aphids by keeping a fan going and shading the plants from the really hot afternoon sun. They are often in greater numbers on plants that are stressed.
Finally, if you do want to use “organic” sprays, simple soapy water works well. (1 teaspoon per gallon). Some people use the kitchen spray with garlic and Tabasco sauce. I think the science is not clear on neem. It definitely works but it works by disrupting insects’ hormonal systems and I’m not convinced it doesn’t adversely affect beneficial insects. Some studies say Neem only kills sucking insects. I would try gentler methods first before turning to Neem.
Did you have fungus problems in your garden this year? Maybe powdery mildew on the squash? Or fungal blight on the tomatoes? One very natural way to treat your soil (rather than try to kill the fungus once it’s on next years’ leaves) is to plant some mustards. Mustard planted now or in early spring, and then cut up and turned into the soil, acts as a “biofumigant” that can kill the unhealthy fungus that has made a home in your soil.
A big plus of planting it now is that you might get cute little plants now that will be a lush cover crop for winter. Some mustards turn a pretty purple once it gets cold. Some plants will die if you are in a very cold or dry area, but often mustards manage to survive and put out yellow flowers in Spring that are excellent first foods for bees.
Another excellent reason to plant mustards now is that just a few spicy leaves go a long way to making a salad interesting. I especially like the curls of the Japanese mustard mizuna. Mizuna pairs beautifully with the richness of feta cheese, some red onions, and a sweeter vegetable like cucumber. Yesterday a friend served a wonderful mustard salad with the last red raspberries of the year.
So more of them will feed you. Last week we talked about being on the home stretch for the vegetable garden (at least here in Zone 5.) Lots of plants are super stressed this year by early rains and now intense heat. In Colorado, some farmers are only now getting their first tomatoes. But unless your tomato plants already have too many tomatoes on them, this is a great time to feed the tomatoes and veggies by boosting their final production with a good liquid organic fertilizer…either a balanced nitrogen-phosphorus mix, a bloom, or kelp. There’s still time to get more tomatoes and bigger tomatoes, so give the plants a reward for making it so far. I even fertilized the zucchini…our delayed season means even the zucchini are slow.
We’ve had blistering heat that has sun-scalded our basil and some greens. I’m doing a light feed to these plants too as compensation for all the suffering they’ve had to go through this year. Some people throw some row cover over greens when the sun is intense to give a little protection.
But tomatoes don’t need any protection from the sun as long as they have consistent water.
One other tomato season task: Do a taste test while the tomatoes are at their peak. It’s amazing how differently the same variety will taste from year to year….and sometimes you’re the one who has changed and you find you like some flavors more than others. Organize a testing with friends who bring their varieties, and you’ll have a fine summer party. So far Black Krim is still my favorite (in big tomatoes; Red Cherries are still my favorite eat off the vine taste.
https://bbbseed.com/wp-content/uploads/2023/11/BBB-Seed-logo-with-tagline-2023.png00Mike Wadehttps://bbbseed.com/wp-content/uploads/2023/11/BBB-Seed-logo-with-tagline-2023.pngMike Wade2015-08-24 14:50:502021-02-24 11:34:49Feed the Tomatoes and Veggies
We may request cookies to be set on your device. We use cookies to let us know when you visit our websites, how you interact with us, to enrich your user experience, and to customize your relationship with our website.
Click on the different category headings to find out more. You can also change some of your preferences. Note that blocking some types of cookies may impact your experience on our websites and the services we are able to offer.
Essential Website Cookies
These cookies are strictly necessary to provide you with services available through our website and to use some of its features.
Because these cookies are strictly necessary to deliver the website, refusing them will have impact how our site functions. You always can block or delete cookies by changing your browser settings and force blocking all cookies on this website. But this will always prompt you to accept/refuse cookies when revisiting our site.
We fully respect if you want to refuse cookies but to avoid asking you again and again kindly allow us to store a cookie for that. You are free to opt out any time or opt in for other cookies to get a better experience. If you refuse cookies we will remove all set cookies in our domain.
We provide you with a list of stored cookies on your computer in our domain so you can check what we stored. Due to security reasons we are not able to show or modify cookies from other domains. You can check these in your browser security settings.
Google Analytics Cookies
These cookies collect information that is used either in aggregate form to help us understand how our website is being used or how effective our marketing campaigns are, or to help us customize our website and application for you in order to enhance your experience.
If you do not want that we track your visit to our site you can disable tracking in your browser here:
Other external services
We also use different external services like Google Webfonts, Google Maps, and external Video providers. Since these providers may collect personal data like your IP address we allow you to block them here. Please be aware that this might heavily reduce the functionality and appearance of our site. Changes will take effect once you reload the page.
Google Webfont Settings:
Google Map Settings:
Google reCaptcha Settings:
Vimeo and Youtube video embeds:
Other cookies
The following cookies are also needed - You can choose if you want to allow them:
Privacy Policy
You can read about our cookies and privacy settings in detail on our Privacy Policy Page.