Tomato Staking 101

Supporting Tomatoes

by Heather StoneTomato plant in a cage for support.

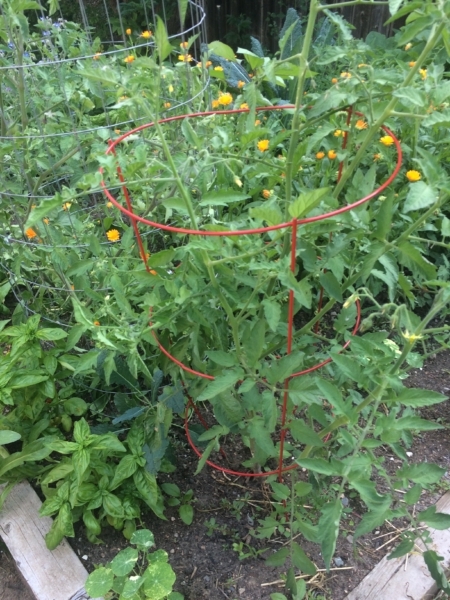
 The ways in which to support tomatoes are as varied as the gardeners who grow them. Staking your tomatoes is important for many reasons. Keeping your plants upright and off the ground helps keep not only insects and critters at bay but can prevent many tomato diseases as well. Click here to check out our comprehensive guide to tomato diseases. Staking maximizes growing space, makes harvesting easier and keeps the garden looking tidy. Here is a little information about three different methods you can use to successfully stake your tomatoes.
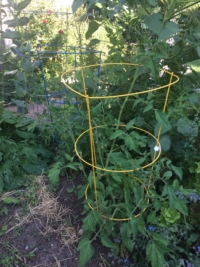
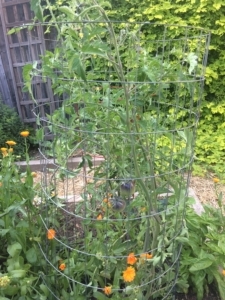
Tomato plant supported by a cage.

Cages

Caging tomatoes is an easy and efficient way for the home gardener to support tomatoes. Store bought cages come in a wide variety of sizes and colors. The smaller cages are more appropriate for determinate tomato varieties which are more compact in size averaging around 3-4’ tall. The larger cages will best suit the large, sprawling indeterminate varieties which can range in height from 6-12’.


You can make your own tomato cages too. Hardware stores sell rolls of wire fencing or mesh that when cut in 5’x5’sections can be rolled into a circular cage and placed over the plant. This is best done while the plants are still small. Pin the ends together with wire or zip ties and anchor the cage into the ground with stakes. Make sure your grid openings are at least four inches in diameter. This will make pruning and harvesting a breeze. These cages are sturdy and will last for years.

Tomato plant supported by a section of wire fence.

Stakes

Staking tomatoes is also an effective way to support your tomatoes. This method simply requires driving a stake into the ground near the plant and tying the plant up the stake as it continues to grow. To avoid any root damage, place stakes in the ground before planting or when plants are still young.

For indeterminate tomato varieties, stakes should be at least 7 feet tall and driven a good foot into the ground. This will keep the stake from tumbling over with the weight of the plant. Stakes can be wood, plastic, metal or made from salvaged materials. When tying up your tomatoes, it is best done loosely and with a soft material. I like to use old t-shirts cut into strips.
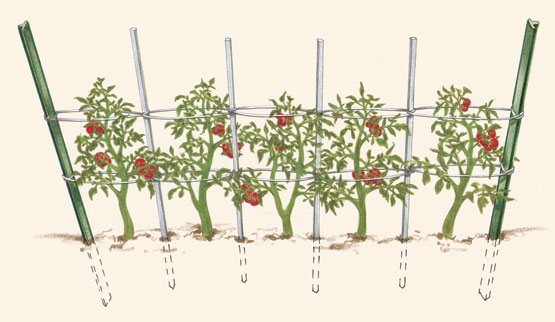
The Florida Weave

http://www.finegardening.com/how-to/articles/supporting-cast-for-tomatoes.aspx

In the Florida or basket weave technique you are essentially sandwiching your tomato plants between two walls of twine. This technique works best when you are planting in rows. Begin by placing one stake at the end of each row, or space stakes every 3- 4’ apart for longer rows. Drive stakes into the ground at least one foot deep. Next, tie your twine to your end stake about 8-10” from the ground. Pull the twine past one side of your tomatoes to the front of the next stake. Loop the twine around the back of the stake and pull tight. Keeping the string taught continue down the row until you reach your last stake. Tie off at the last stake. Now, loop back the other direction until you are back where you started. Tie the twine to the first stake. As your tomatoes grow you will need to add another layer of twine about every 6-8” to keep the plants upright.

Check out this video demonstrating the Florida or basket weave technique.

SUMMER HARVEST

Favorite Summer Vegetables

by Engrid Winslow

At last, the bounty of your summer garden is at its peak and you can gather all of those glorious tomatoes, peppers, eggplants, corn, chard, kale, summer squash, onions and other vegetables to enjoy at their freshest and most flavorful. But, ahem, some of us may plant more than we can eat in a day. Well, whether that is planned excess or not, here are a few tricks for preserving that bounty using just your freezer and pantry.

Onions –

When the tops flop over onto the ground it’s time to pull them out and let them dry out in the sun or inside in a cool, dry location. Some onions, such as cippolini, are great storage onions but for the ones that aren’t…Ever tried onion jam? How about bacon and onion jam. You can refrigerate them and use them up quickly or pop a few jars into the freezer for a festive addition to a holiday cheese platter. Here are the links to two delicious recipes you can try:

http://www.cookingchanneltv.com/recipes/onion-jam https://cooking.nytimes.com/recipes/1015978-bacon-onion-jam.

You’re welcome.


Corn –

Shuck as much as you can and then flash boil for about 2 minutes. Let cool and then scrape off the kernels into a large bowl and scoop out two cups into a plastic bag or container for freezing. Add them to that turkey soup you make after Thanksgiving every year along with some of the frozen shell peas you harvested and froze in the spring.

Tomatoes –

This technique works best with cherry tomatoes and is a little bit of trouble but OMG are these delicious. Add them to pizza, pasta, soups, sandwiches or serve on grilled bread as a quick crostini. The flavor of these will make you want to plant even more tomatoes next year. Heat oven to 200 degrees. Arrange cherry tomatoes on a lined, rimmed baking sheet, cut side up. Drizzle with olive oil and add a sprinkle of salt and pepper. Let them “oven dry” for up to 2 ½ hours, checking frequently at the two-hour mark. You can also do this with large tomatoes which will yield a “saucier” result.


Zucchini –

Use small, tender-skinned, deep green ones. Shred and steam for 1-2 minutes. Freeze in desired quantities for adding to slaw, pasta, soups or your famous zucchini bread.

How to Get Rid of Weeds

Tips for Weeding

by Sandy Swegel

That’s the question I hear most often in Spring.

The question comes most often from my friends who are very smart and successful in busy lives.  Their garden is one aspect of their beautiful complicated lives but it’s always a challenge because it’s not easy to make nature conform to what you want with one big weekend cleanup.

So there was an animated discussion about the best digging tools and homemade vinegar solutions. Everyone wants to protect the earth and the bees but frankly feel they have failed when the same weeds overwhelm their garden every season.  You know the weeds I mean, the ones that have grown very tall when you walk into your yard in late June and see that they just went to seed, making thousands of new baby weeds.

At some point, someone asks me what my tool is as a professional gardener.  My friends never find my answers very entertaining, so they usually return to a discussion of their latest internet surefire natural weed killer.  Nevertheless, here is my answer from years of experience of dealing with weeds.


The best tool is diligence.  Weeds have a strong will to live and procreate.  You have to be vigilant for them and keep after them.

After setting a firm determination about what weeds are permissible and which aren’t, then here are some techniques.

Get them when they are little.

Right now in your gardens, there are thousands of tiny weed seedlings you could control with one stroke of your hand hoe.  Off with their heads:  tiny seedlings don’t survive if they loose their leaves. Learn what young weeds look like.  Bindweed babies are cute little heart shapes.


Learn to love them. 

Dandelions are the best example of a “weed” you can learn to love.  In moderation of course.

They are very cute…children love them.  They are one of the first foods of hungry bees each Spring.  You will have more time and less frustration in your garden if you don’t have to eradicate all the dandelions.


If you do decide to get rid of perennial weeds…be smart and determined.  Don’t just hack it up in frustration every Spring and let it grow and strengthen the rest of the year.  You can’t get nasty perennials all at once….but you can wear it down and weaken it.  I have a sharp hori-hori knife and dig out at least four inches of root.  If the weed reappears, I recognize it and dig a little deeper the next time.  Soon it will exhaust itself and give up.


Finally, have a cup of tea.

Or at least get the electric kettle out.  Boiling water or hotter steam does an excellent job in rocks and walkways,  especially when weeds are young. And it is very satisfying.


Photocredits

https://weedecology.css.cornell.edu/weed/weed.php?id=6

http://www.blikk.hu/eletmod/tippek/elleptek-a-kertjet-a-gazok-igy-szabadulhat-meg-toluk/f38r539


YELLOWJACKET TRAPS, THEN PANSIES

Spring Solutions for Yellow Jackets

By: Sandy Swegel

Is Spring about to happen in your neighborhood? Before you start getting pansies or collecting daffodils, stop and put out your yellow jacket traps…if yellow jackets are a problem for you in the summer.

The yellow jacket life cycle is pretty simple. Almost all the yellow jackets die off in winter. Single queens that already “mated” go into winter hibernation…in the ground, or your shed, or woodpile. Once warm weather starts in the Spring the queen wakes up, builds a new nest and starts laying eggs for this year’s yellow jackets. One little queen easily lays 500 eggs. Conservatively, every queen you catch now means hundreds fewer yellow jackets gathering at your picnics in the yard this summer. It is so much easier to catch one queen now than to tackle nests full of angry yellow jackets under your picnic table in July.

A simple pheromone trap works great…it lures the queen to those yellow plastic hanging traps. This is no time for simple soapy water. You’ll be glad you spent the $5 for the pheromone lure refills. And the lure doesn’t affect honeybees.

Catching the queens isn’t always predictable. I put up more than one trap. Last year the trap by the BBQ grill caught ten queens. And a trap under a tree caught two. It seems to differ every year. But I will be grateful come summer.

It’s definitely the time in this warm March we’re having in Colorado. It was 80 degrees today…I got stung cleaning up debris in the perennial bed. The queen rolled over from her winter nap and sunk her stinger into me as revenge. Ouch. Yellow jackets hurt so much more than other wasps. If you don’t go outside in the summer, then let the yellow jackets live. But since they don’t play well with others, I believe in a strong birth prevention policy.

Photocredits:
www.rescue.com/bug/yellowjackets
greenbugpestandlawn.com/learning-center/flying-pest

ILLITERATE GARDEN

Garden Problems We All Have

By: Sandy Swegel

“My garden is illiterate.  It didn’t read the book about what it can’t do.”

That was the wisecracking opening remark at a gardening talk I attended recently.  We all laughed and during the break we started talking about some of the stupidest plants we know.

Looking at wild plants, we laughed about orchids native to cold, arid Colorado.  But the most illiterate plants are the ones we humans planted because we didn’t know better.

The plants that don’t know they can’t survive in Zone 5.

Pineapple sage don’t you know anything? You like living in semi-tropics.  What are you doing living another year in the Colorado clay soil iris garden with 70 mph winds?

The plants that don’t know that being an annual means can’t live longer than one year.

Yep Verbena bonariensis I’m talking about you.  The books say you are an annual but I’ve watched you survive for three years in a row.  Ditto snapdragons…I have trees younger than you.

Plants that don’t know they are supposed to be invasive.

I’m waiting for you, bamboo. Any day now you’re supposed to fill in that entire border between my yard and my neighbor’s ugly garage.  Sure, four years ago I saw one runner into the grass…but what have you done lately?

Codependent plants.

These are the plants that not only don’t know they can’t survive but also put up with terrible abuse.  Don’t be sweet-talking me Japanese Maple.  You know who you are.  You croaked all those times I planted you in protected areas and nurtured you with extra mulch in winter and water in summer.  But the year I put you, a tree, in a pot with six other plants on a third-floor deck without protection from the cold and without winter watering…that’s the year you survive?

If it were up to humans, we’d never have surprises in the garden or tulips blooming in July or scabiosa blooming in December literally under the snow.  Or the gallardia that blooms in my driveway. We won’t even mention the weed that seeded and bloomed in my truck bumper the December I was driving around Louisiana.

What a relief that our plants are so darn illiterate.


Photocredits:

fullycoolpix.blogspot.com/2014/08/plants-live-everywhere.html

www.boredpanda.com/plants-flowers-versus-concrete-asphalt-pavement/


The Windy Garden

Building a Wind Resistant Garden

By: Sandy Swegel

This could be a perfectly beautiful early Spring. We’ve had a week of warm sunny weather that is waking up the daffodils and tulips. Birds are flitting about and energetically singing out mating calls. It’s a joyful break from dark winter days. But then there’s the wind. Chinook winds. Or as they were called the year I lived in the Alps, “scheiss foen.” Everyone understood if the foen had arrived that you could be in a foul mood because of the irritability and headaches from the air pressure changes these mountain-made winds caused.

Wind can have devastating effects on a garden. Sure the strong winds can break stems and tree branches, but the greatest stressors comes from the drying effects of the winds. Plants close their stomata (leaf pores) to reduce water loss, but that slows the plants’ ability to grow. The winds desiccate the plant tissue and dry out the top inches of the soil meaning the plants need more water. Even plants under snow cover can get very drought stressed because the winds evaporate the snow before it can melt.

If it’s going to be a windy season, I make a few mental changes in my garden plans. Here’s things to consider if you have a windy garden:

Use more drought tolerant plants.
Increase your watering after the winds die down.
Grow shorter plants.
Grow plants like lavender with thinner leaves that won’t desiccate so easily.
Plant some tall ornamental grasses through the flower garden. They look beautiful in the wind and provide some wind break protection.
Plant evergreens as windbreaks.
Consider a garden wall.

And take an aspirin for your sinus headache.


Photocredits:

http://clarenbridgegardencentre.ie/
Top Tips for Windy Gardens
http://www.pc.gc.ca/pn-np/ab/waterton/ne/ne-galerie-gallery-2.aspx?a=1&photo=%7Bdfae32e8-4d1e-47e4-a909-08c9ea68dd13%7D

Give your House Plants a Spa Day

House Plant Care

By: Sandy Swegel

Right about this time of year is when your indoor plants are all stressed out. It’s been months of winter and dry heated air. Outdoors in nature, wild plants are enjoying spring rains that clean off their leaves and freshen their soil.

Once again, we plant lovers know to mimic nature if we want our plant friends to thrive in the odd conditions we try to grow them in. Growing plants under a roof without moving air or overhead moisture is definitely odd.

The plants I’m wintering over are the most stressed. The hibiscus has aphids. White fly that I thought I eradicated shows up in the sunroom. Scale is appearing on the underside of waxy leaves.

Time to give your house plants a Spa Day.

Take any plants that are moveable and bring them into your shower. Don’t forget a good drain catch…you don’t need perlite in your sewer pipes. Bring in the non-buggy plants first. You don’t need to spread pests and disease. Clean off dead or diseased leaves and give the whole plant a good overhead shower. Use the hand sprayer to get the underside of leaves.

Pretend you are a spring thunderstorm and really soak the soil so that water runs out the bottom taking away some of the built up salts. Use soapy water to treat any soft-bodied pests. Use your fingernail or a Q-tip with alcohol to remove scale sacs.

After the bathing and dripping dry, add a layer of clean compost — earthworm castings work great. Then douse the soil with a good natural liquid fertilizer—I like seaweed based fertilizers because then everything smells ocean fresh.

Your plants will be grateful for their Spa Day and perk right up from all that moisture and a good meal.

Of course, you might need your own Spa Day after you finish cleaning up the mess. But we all enjoy a good Spring shower.


Photos:
www.ourhouseplants.com/guides/cleaning-your-plants
www.thesmallgarden.com.au/blogpages/how-to-holiday-proof-your-garden-this-summer


Attract Chickadees to Your Garden

All About Chickadees

by Sandy Swegel

Chickadees are out and about on warm winter days.  They are the tiny white birds with black heads that are flittering and chirping vocally on sunny January days.  I often see them in the top branches of evergreens.

Chickadees are small birds that don’t migrate but hunker down in tree cavities to survive the winter despite their tiny bodies.  You can have lots of chickadees in your garden if you keep a simple tube feeder with seeds (they love black sunflower seeds.). You can also feed them with your garden by leaving the seed heads on all the plants for the chickadees to sit on or hunt and peck for.  Chickadees need a lot of food …. the eat about a third of their body weight per day.


And that is why you want them to live in your garden.  They may rely on seeds in winter but come early spring and mating time, they get about 80% of their diet from insects.  They eat so many insects, some wildlife fans call them the pest exterminator of the forest.  And their favorite insect?  Aphids!  Tiny aphids are the perfect food for tiny chickadee beaks.  The birds are very systematic and will cling to a plant stem eating one aphid after another until they clear the entire stem. In spring before your plants are even sending up new stalks, the chickadees will pick in leaf litter finding the baby aphids just as they hatch or even just eating the yummy aphid eggs.


Photo credits

https://www.nwf.org/News-and-Magazines/National-Wildlife/Gardening/Archives/2016/Help-Birds-Stay-Warm.aspx


http://www.audubon.org/field-guide/bird/black-capped-chickadee


Get A Head Start on Leeks

Get a head start on leeks

Heirloom Vegetable Seeds

by Sandy SwegelAmerican Flag Leek

Organic leeks were $3.99 a pound in my grocery store this week. I love leeks because they add a more rich and complex flavor to soups and sauces than onions do. They are more expensive than onions but just as easy to grow. The only challenge for gardeners in areas with winter is that leeks have a long growing season and it’s not as easy to find leek seedlings for sale come planting time. In January, you can get a head start on leeks as this is an ideal time to start some seedlings to transplant this spring.


The ideal germination conditions for leek seeds are about 70 degrees in moist soil. They will germinate in cooler temperatures but may take a few more weeks to emerge.

Even though the seeds are small, germinate them in containers at least four inches deep rather than in a very shallow tray. We gently push the seeds about half an inch deep into the light potting mix. The seedlings don’t need individual cells so you can grow them in one big container. Their roots will intertwine but easily tease apart without breaking come planting time.


Once the leeks are growing they will continue to need light but easily handle cooler conditions if you need your indoor lights for something else. An unheated cold frame or a makeshift hoop house works great.

Come planting time, we plant the baby seedlings into six inch deep trenches (we want lots of long white stems). For now, just get those seeds started. The only thing to remember is not to let the soil dry out.

I always grow more leeks than I’m going to eat and leave them in the garden to flower. The leek flowers are beautiful and attract butterflies and bees!

Quit Working so Hard This Fall

Garden Clean Up

by Sandy Swegel

The old adages say cleanliness and hard work are virtues. That may be true in your kitchen, but in the garden, a little sloth can save many lives and make your life a little easier.  Mother Nature isn’t just messy when she clutters up the Fall garden with leaves and debris….she’s making homes for her creatures.  Old dead leaves may look like clutter that needs to be tidied up, but it’s really nice rustic sustainable homes for many of a gardener’s best friends.

Here’s who is hiding in your garden this winter if you DON’T clean up.

Ladybugs in the garden beds next to the house.  Ladybugs want a nice sheltered home safe from wind and exposed soil. I most often find them under the leaves and dead flower stalks in the perennial garden.

Butterfly larvae (aka caterpillars) in leaf bundles. Sometimes in winter, you’ll see a couple of leaves looking stuck to a bush or tree or in a clump on the ground.  Often there’s a butterfly baby overwintering there.

Lacewing at the base of willows or in the old vegetable garden.  Insects don’t work very hard in the fall either.  Often they are eating happily on the aphids in your vegetable garden or your mini forest and just go through their life cycle right there.  They lay their eggs on the bottom of leaves and the leaves fall to the ground.  If you clean up too much, you’ll clean up all the beneficial insect’s eggs

Slugs in your hosta garden. Even slugs are a good thing to leave for the winter.  They will be plump food for baby birds next Spring.

The bottom line is don’t do a good job of cleaning up in the Fall.  Take away any very diseased leaves.  Clean up the thick mats of leaves on the lawn so they don’t encourage lawn fungus.  But leave the flower stalks with seeds and the leaves in the beds.  They insulate and protect plants and insects.

Another good reason to be a little lazy this Fall.

Photos: http://www.nashvilleparent.com/2013/07/fall-for-fun/http://antsbeesbutterfliesnature.blogspot.com/2009/11/overwintering-caterpillars.html